Self-hosted WordPress still gives you the most control over themes, plugins, ownership, and monetization. Hostinger remains one of the easiest budget hosts for that first install in 2026 because hPanel walks you through domain choice, WordPress credentials, and SSL without asking you to touch FTP. This guide shows the real click path with current screenshots, plus honest notes on plan choice, free subdomains, and what to do after WordPress is live.
You will create a WordPress blog on Hostinger from an existing hosting plan, choose a domain or free subdomain, set a strong admin password, install WordPress, and leave the onboarding screen with a usable checklist. Promotional prices change often, so confirm the live intro rate and renewal price on checkout before you pay. For broader host comparisons, see COMPROMATH’s WordPress hosting for bloggers and cheapest quality web hosting per year guides.
What you need before you start
You need an active Hostinger websites plan with room for another site, an email address you control for WordPress admin notices, and a password manager (or at least a unique strong password). Decide whether you want a custom domain such as yourbrand.com or a free subdomain such as blog.yourdomain.com for testing. A temporary Hostinger domain also works if you only need a sandbox.
Who this path fits. New bloggers, niche sites, and small business brochure blogs that want real WordPress without enterprise pricing. If you already expect heavy WooCommerce traffic or agency-level staging on day one, compare managed options in high performance WordPress hosting before you lock a long prepaid term.
Who should wait. If you only want a free Blogspot address and zero hosting invoices, start with how to create a blog in Blogger instead. You can move later. Hosting is the right buy when you want plugins, fuller SEO control, and a site you can take with you if you change hosts.
Step 0. Buy Hostinger hosting and open hPanel
If you do not have hosting yet, choose a WordPress-ready shared plan on Hostinger. Premium-style plans are usually the better everyday pick for a real blog because they allow more than one website and include practical extras such as a free domain on qualifying terms. Single-site marketing plans can feel cramped once you want a staging subdomain or a second niche site.
Read the renewal column as carefully as the promo sticker. Long prepaid terms look cheap per month, then jump when the term ends. That is normal for this category of hosting, not a Hostinger-only quirk. Create your account, complete payment, and sign in to hPanel. The rest of this tutorial begins from that dashboard.
Step 1. Click Add website in hPanel
In hPanel, open Websites from the left sidebar. You will see your current sites (if any), a search field, and two actions near the top. Use + Add website to start a new WordPress install on your plan. Use Migrate website only when you already have WordPress somewhere else and Hostinger’s migration tool will pull it in.
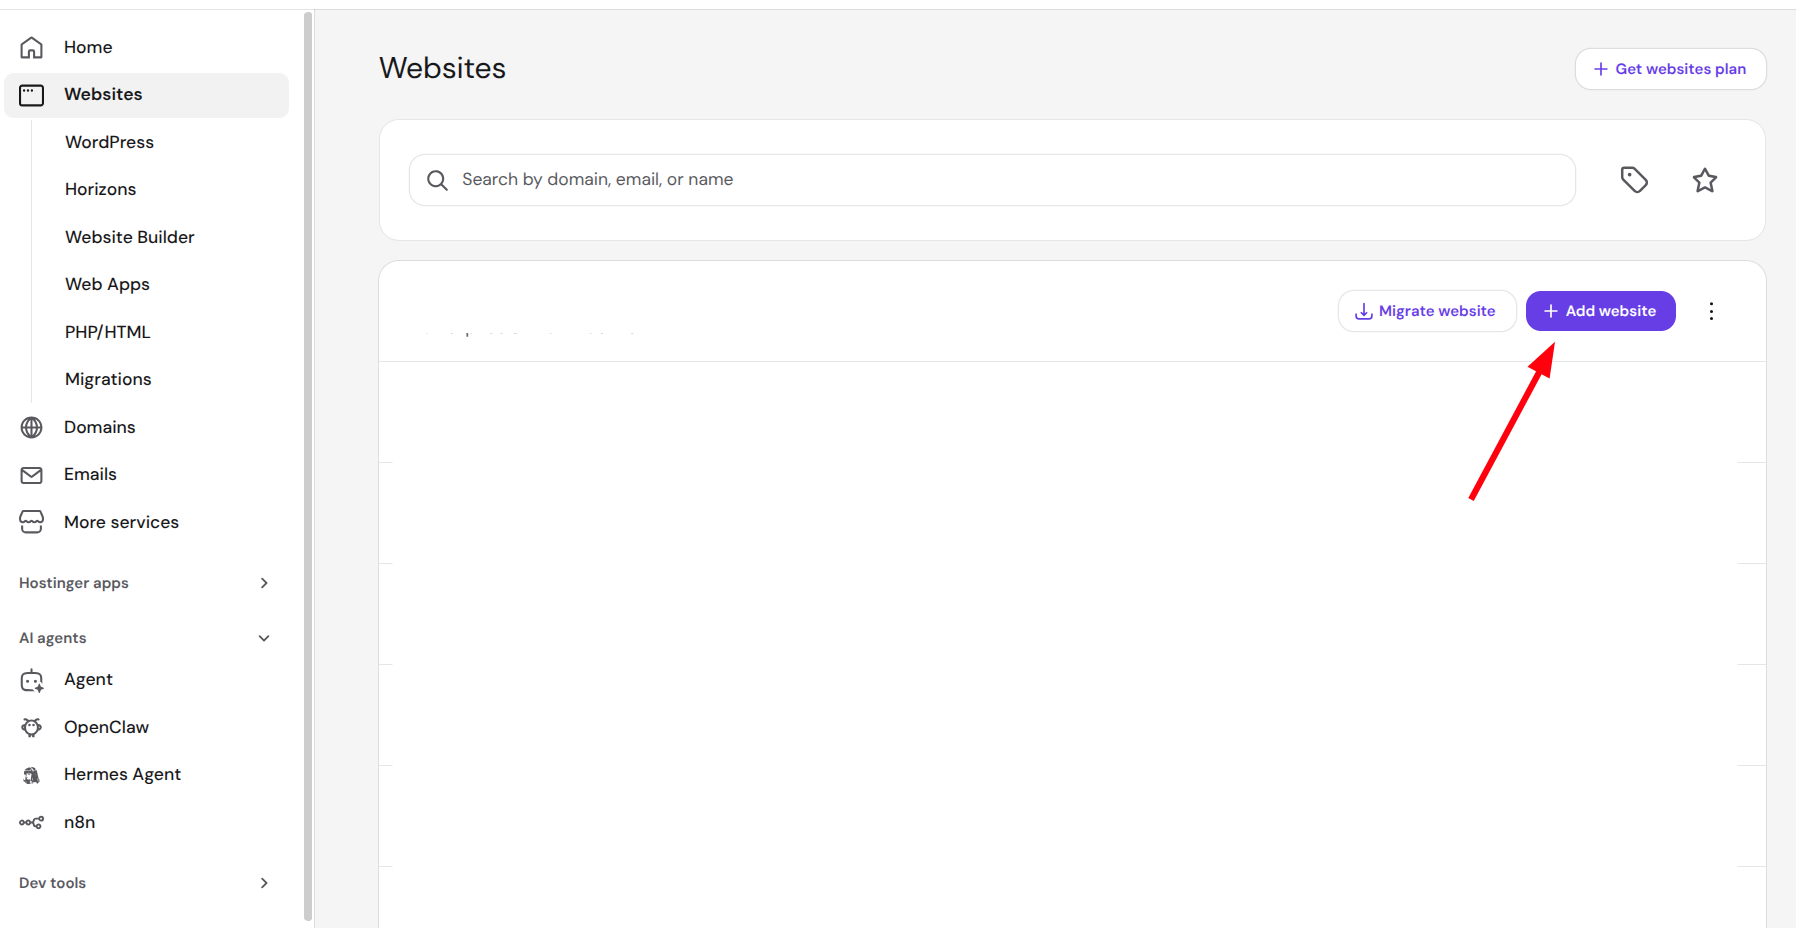
If the button is missing or grayed out, your plan may already be at its website limit. Upgrade the plan or remove an unused site before you continue. Do not buy a second unrelated host just to get past this screen unless you have a clear reason.
Step 2. Choose a domain or subdomain
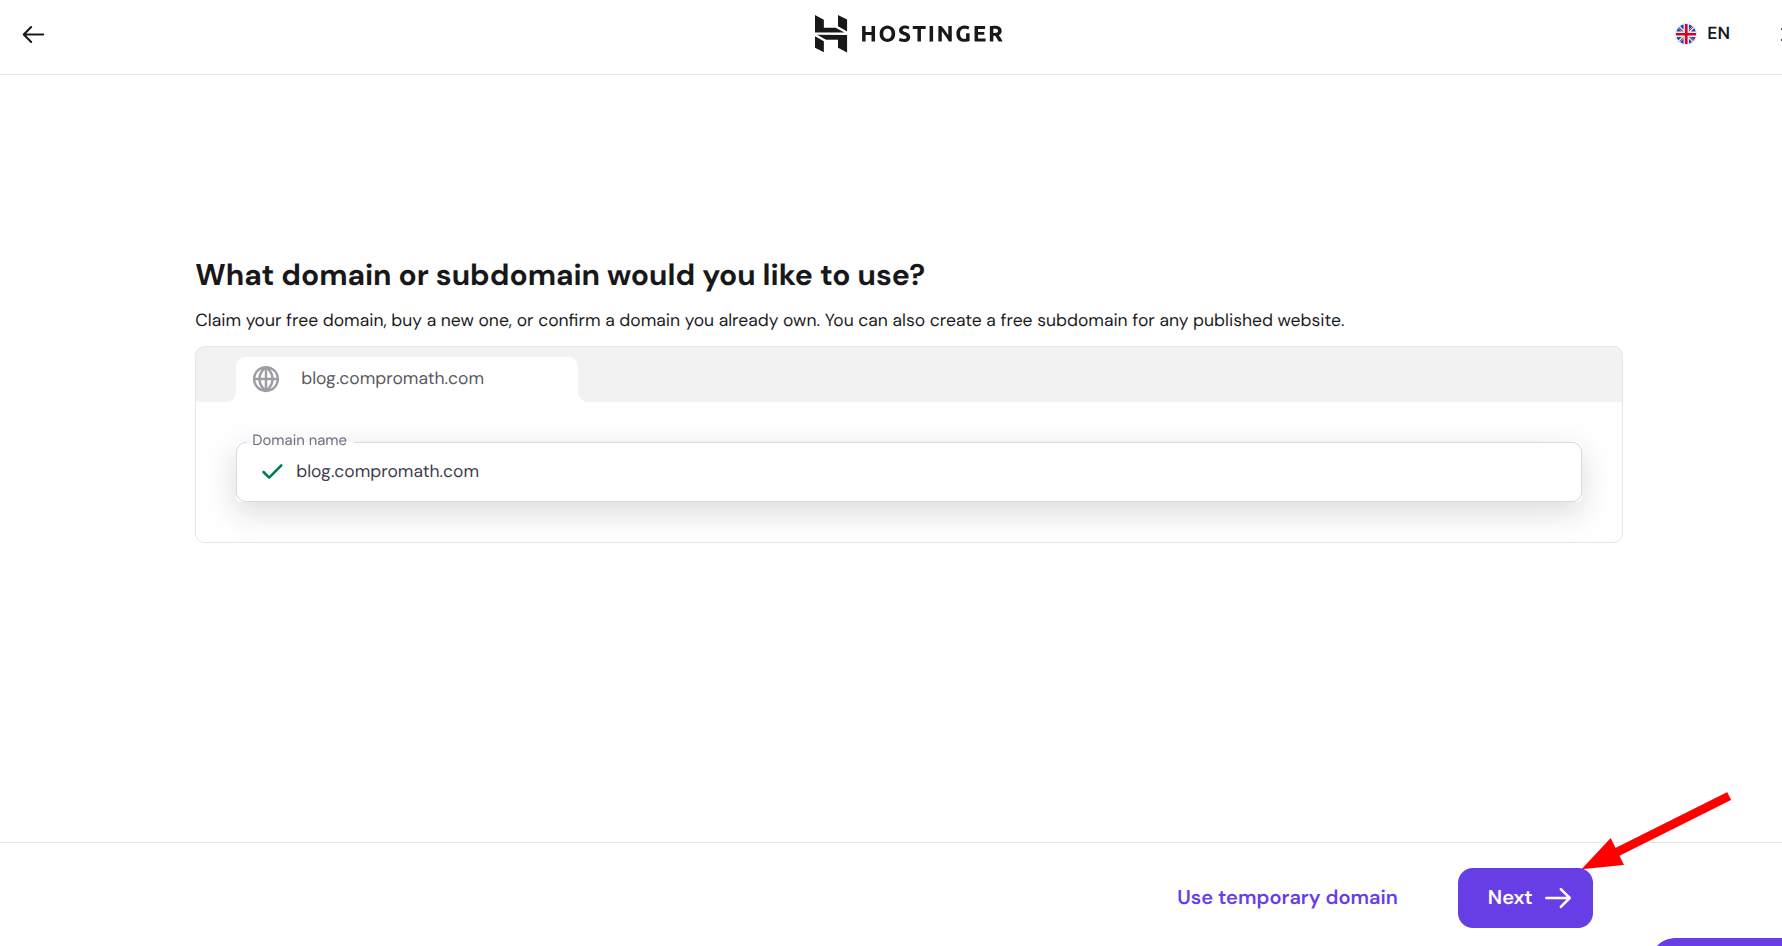
Hostinger asks which domain or subdomain you want to use. You can claim a free domain on qualifying plans, buy a new domain, confirm a domain you already own, create a free subdomain under a domain already on the account, or use a temporary domain for a quick test.
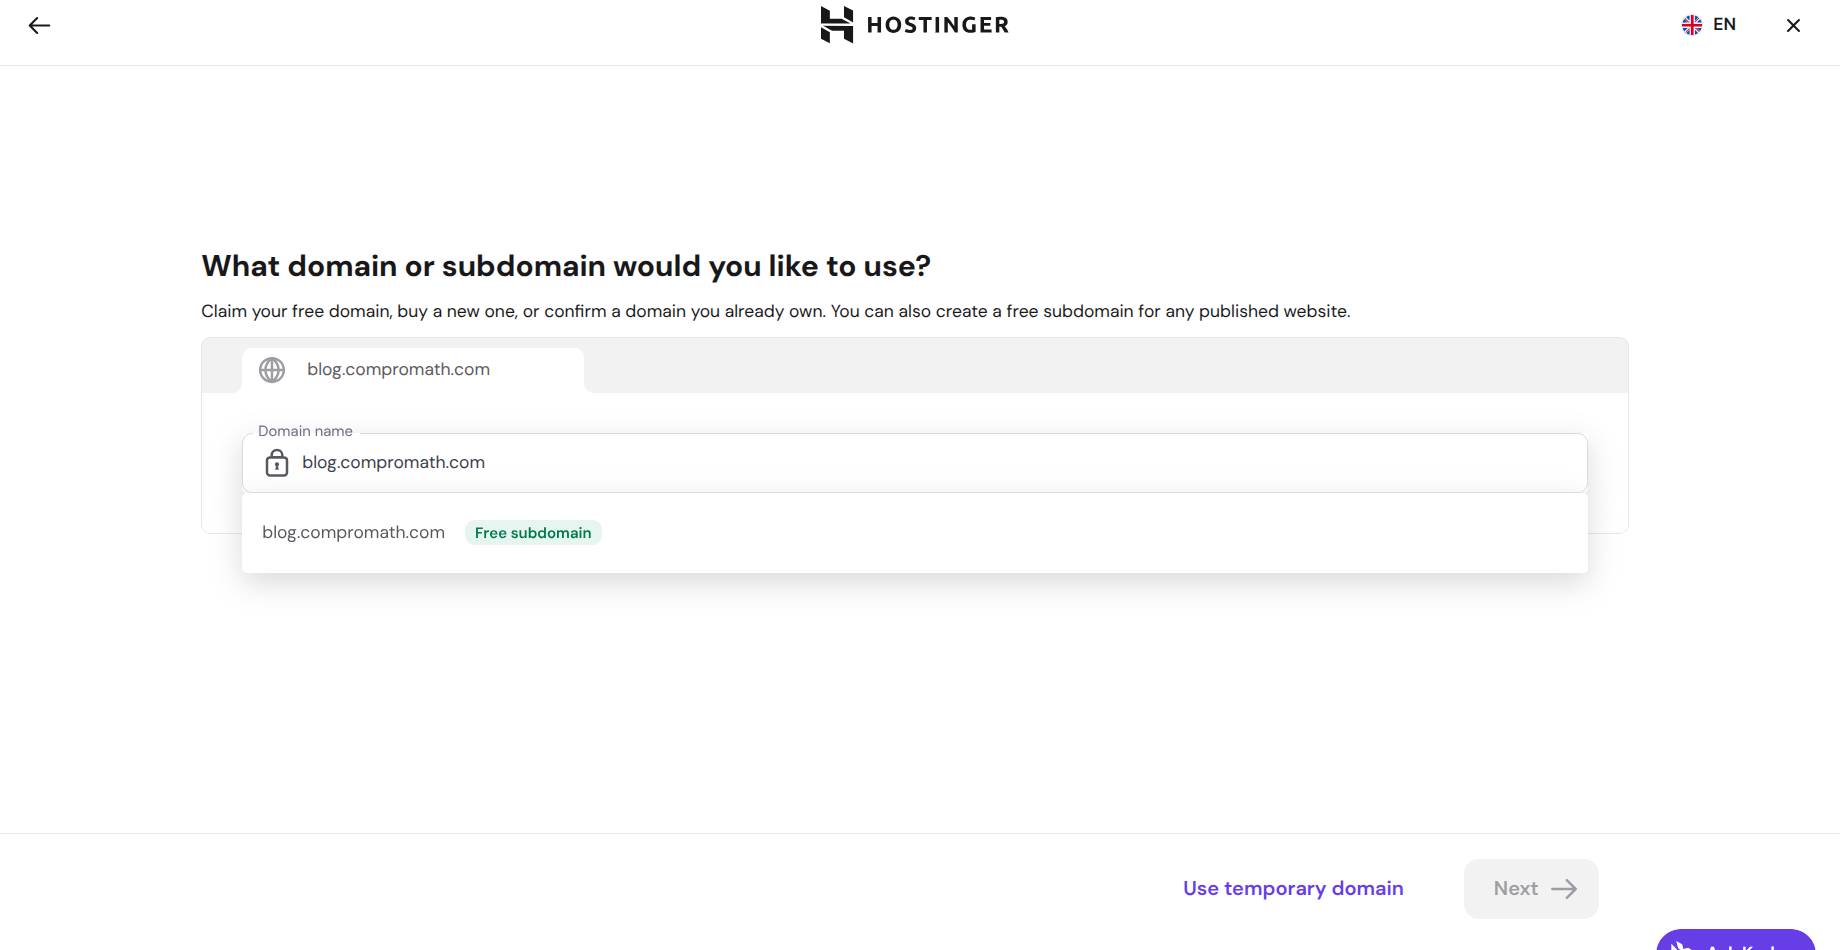
For this walkthrough we used a free subdomain style address under an existing domain. That is useful when the main domain already runs another site and you want a blog at something like blog.yourdomain.com. Brand-new public blogs usually look cleaner on a root domain. Temporary domains are fine for practice, then swap to the real domain before you promote the site.
Step 3. Select your free subdomain option
Type the address you want. When Hostinger recognizes a free subdomain under a domain already attached to your account, it shows a green Free subdomain badge. Select that option so DNS and hosting stay inside the same account without an extra domain purchase.
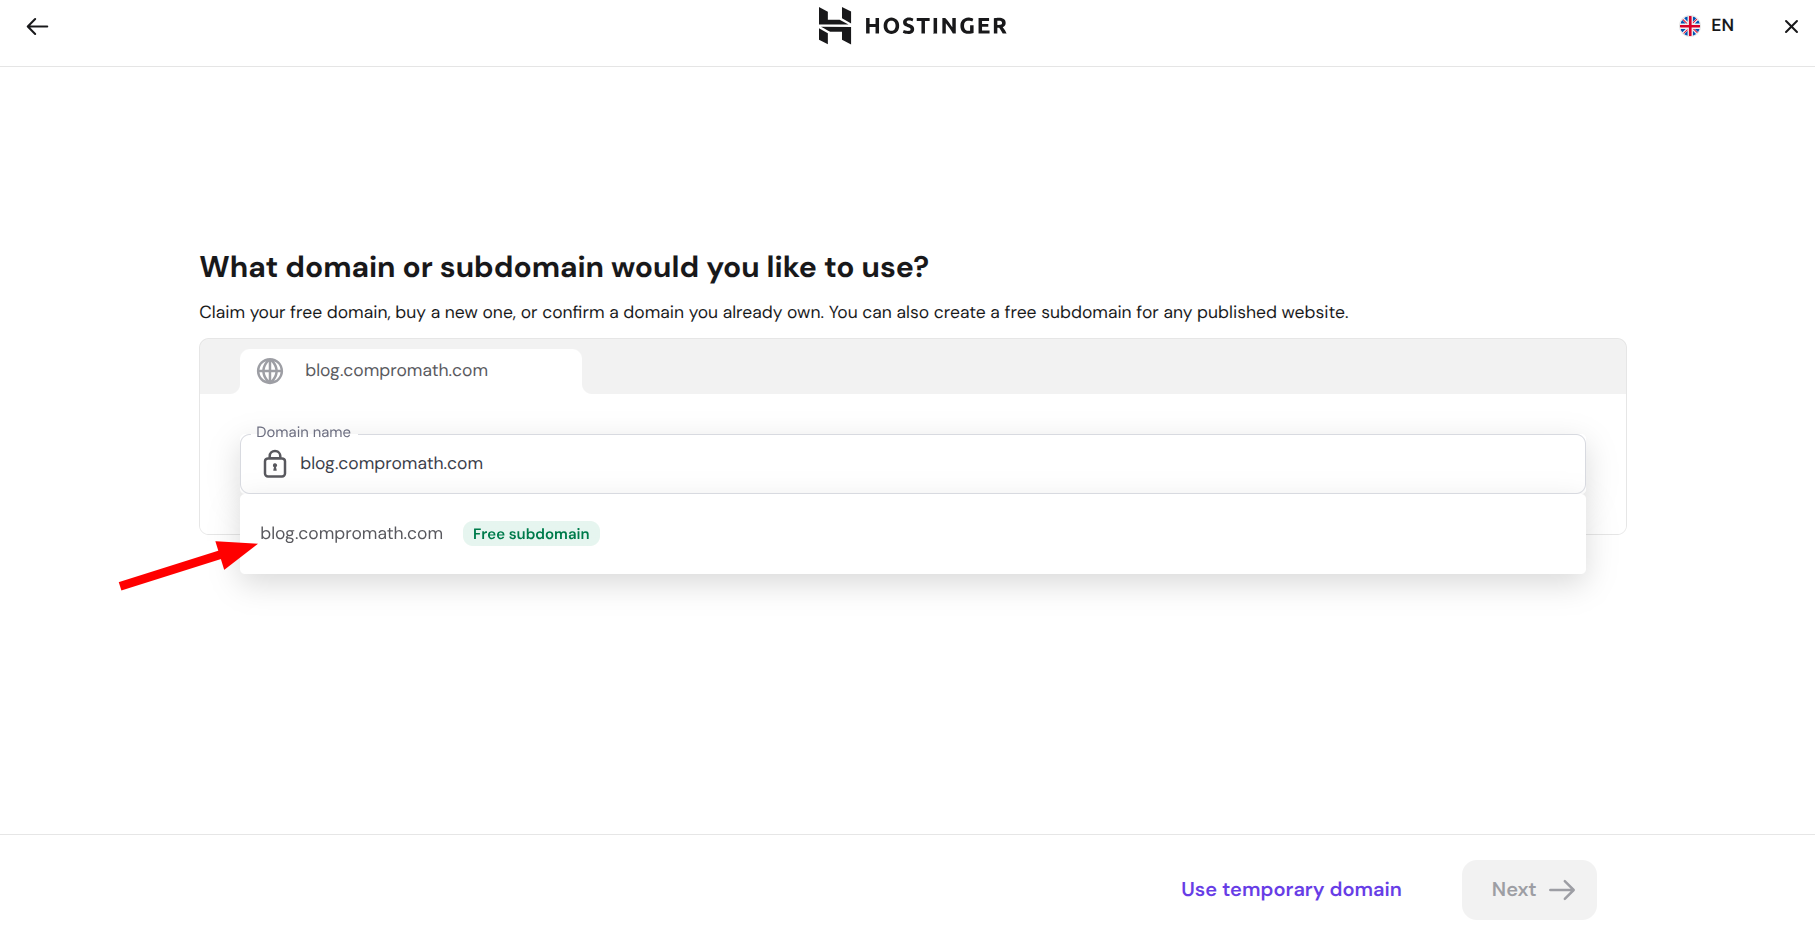
If you are buying or claiming a root domain instead, follow the claim or purchase path on the same screen. Point nameservers or DNS only as Hostinger instructs for that option. Wrong DNS is the most common reason a brand-new site shows “connecting” for hours.
Step 4. Confirm the address and click Next
After the address validates, you should see a green check beside the domain field and an active purple Next button. Click Next to continue. The Use temporary domain link remains available if you change your mind and want a disposable URL for a sandbox install.
Step 5. Create WordPress admin login details
Hostinger now asks for WordPress admin language, admin email, and administrator password. Use a real mailbox you check. Store the password in a password manager. Meet every checklist item Hostinger shows (number, upper and lower case, symbol, length, Latin characters). Weak admin passwords are still one of the fastest ways a fresh WordPress site gets abused.
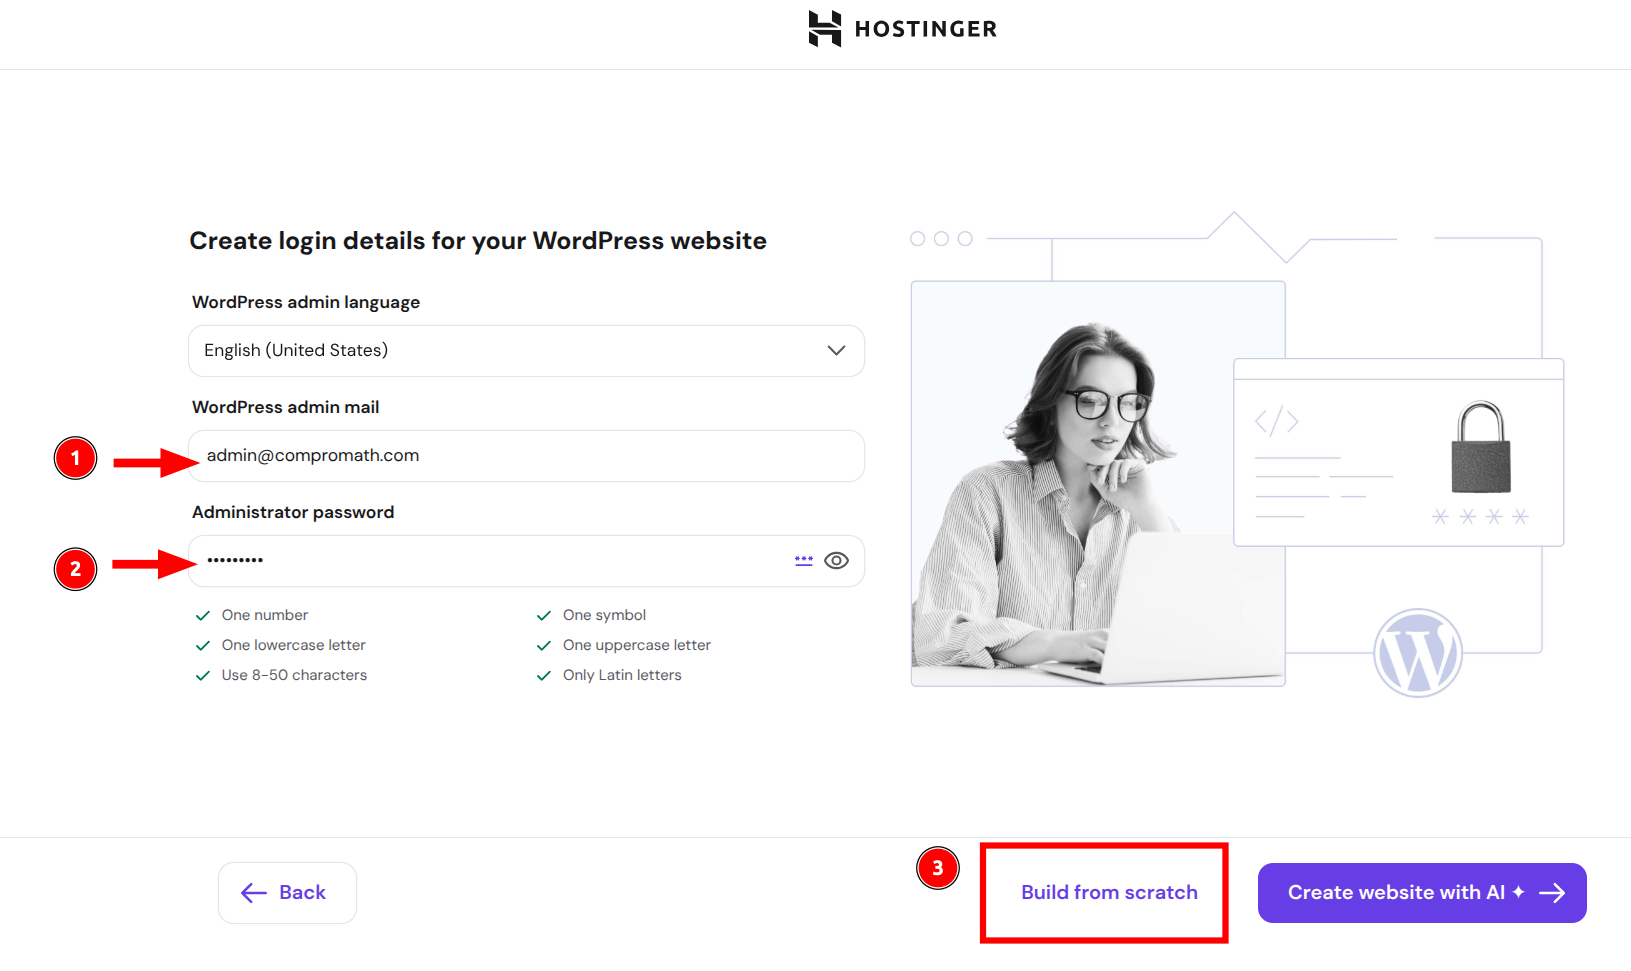
At the bottom you will see two paths. Create website with AI generates a starter layout from prompts. Build from scratch installs a clean WordPress site you theme yourself. For most serious blogs, build from scratch. You keep fuller control of structure, and you avoid spending the first week undoing AI filler pages. Use AI later inside the editor if you want help drafting, not as the foundation of the whole site.
Click Build from scratch after your password checklist is fully green.
Step 6. Wait while Hostinger installs WordPress
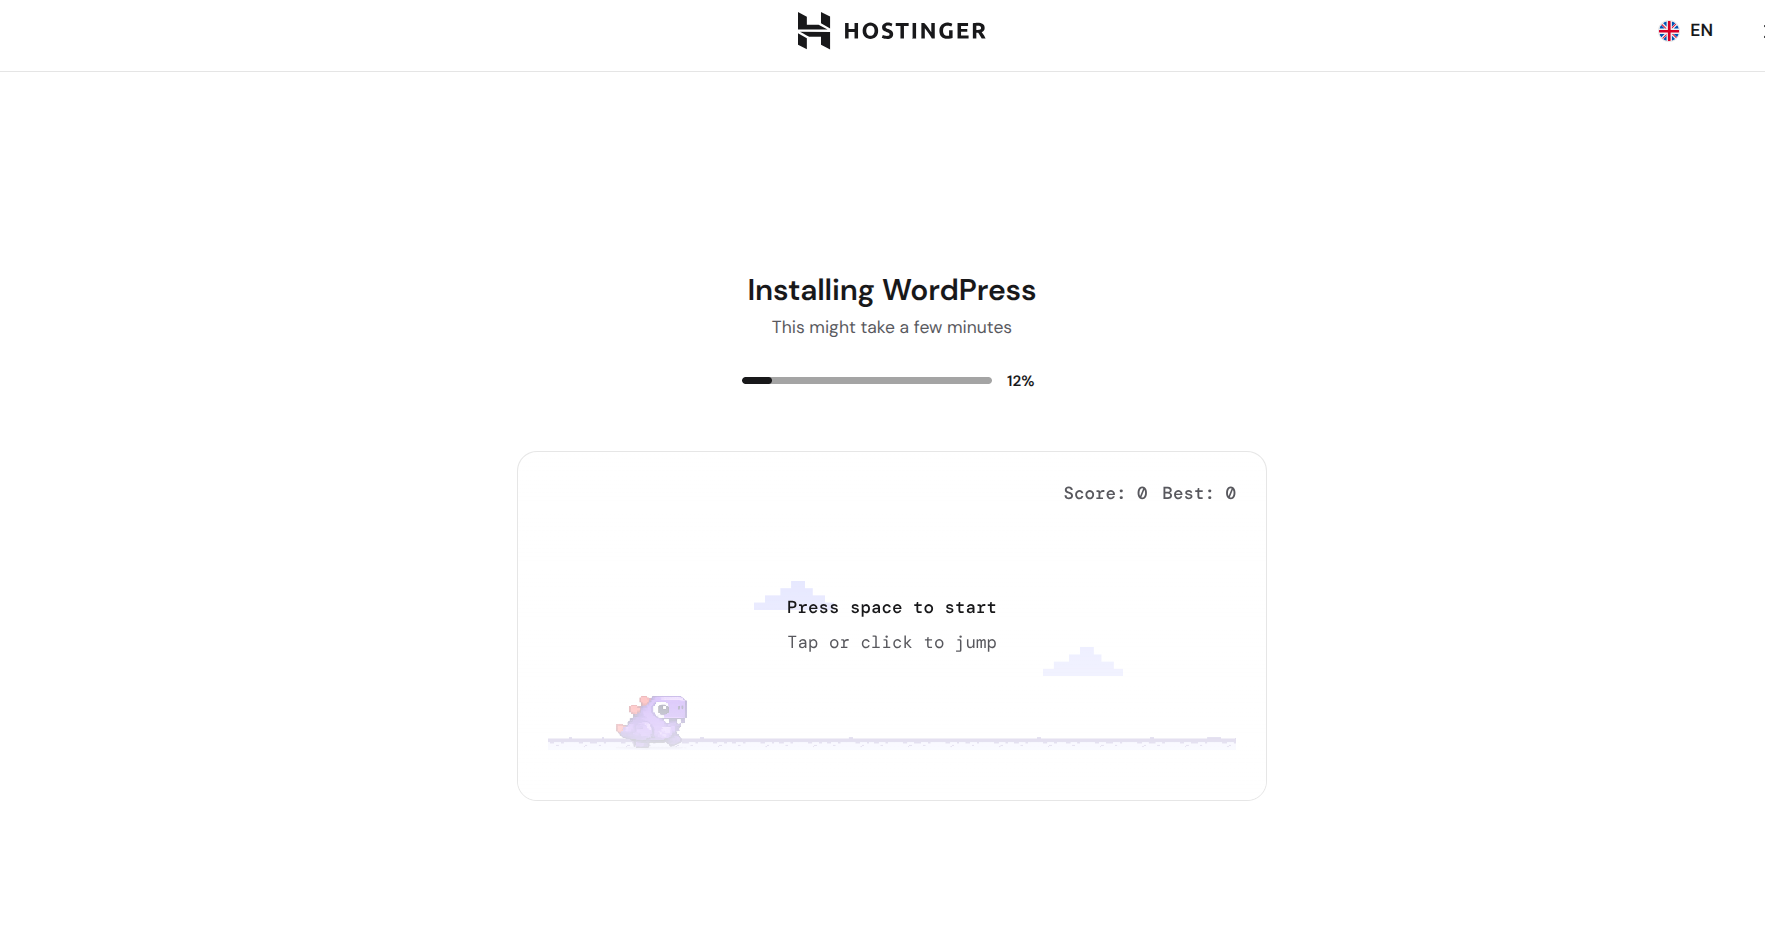
Hostinger installs WordPress automatically. The screen shows a progress bar and usually a small waiting game. You do not upload files by FTP for a standard install. Leave the tab open until it finishes. A few minutes is normal.
Step 7. Land in onboarding and finish the basics
When installation completes, Hostinger opens an onboarding view layered on WordPress. You should see domain status, hosting plan status, and a setup checklist. Domain may still show Connecting while DNS propagates. Hosting should show Active. Use Preview site to confirm the public URL loads, and Edit site when you are ready to work in the editor.
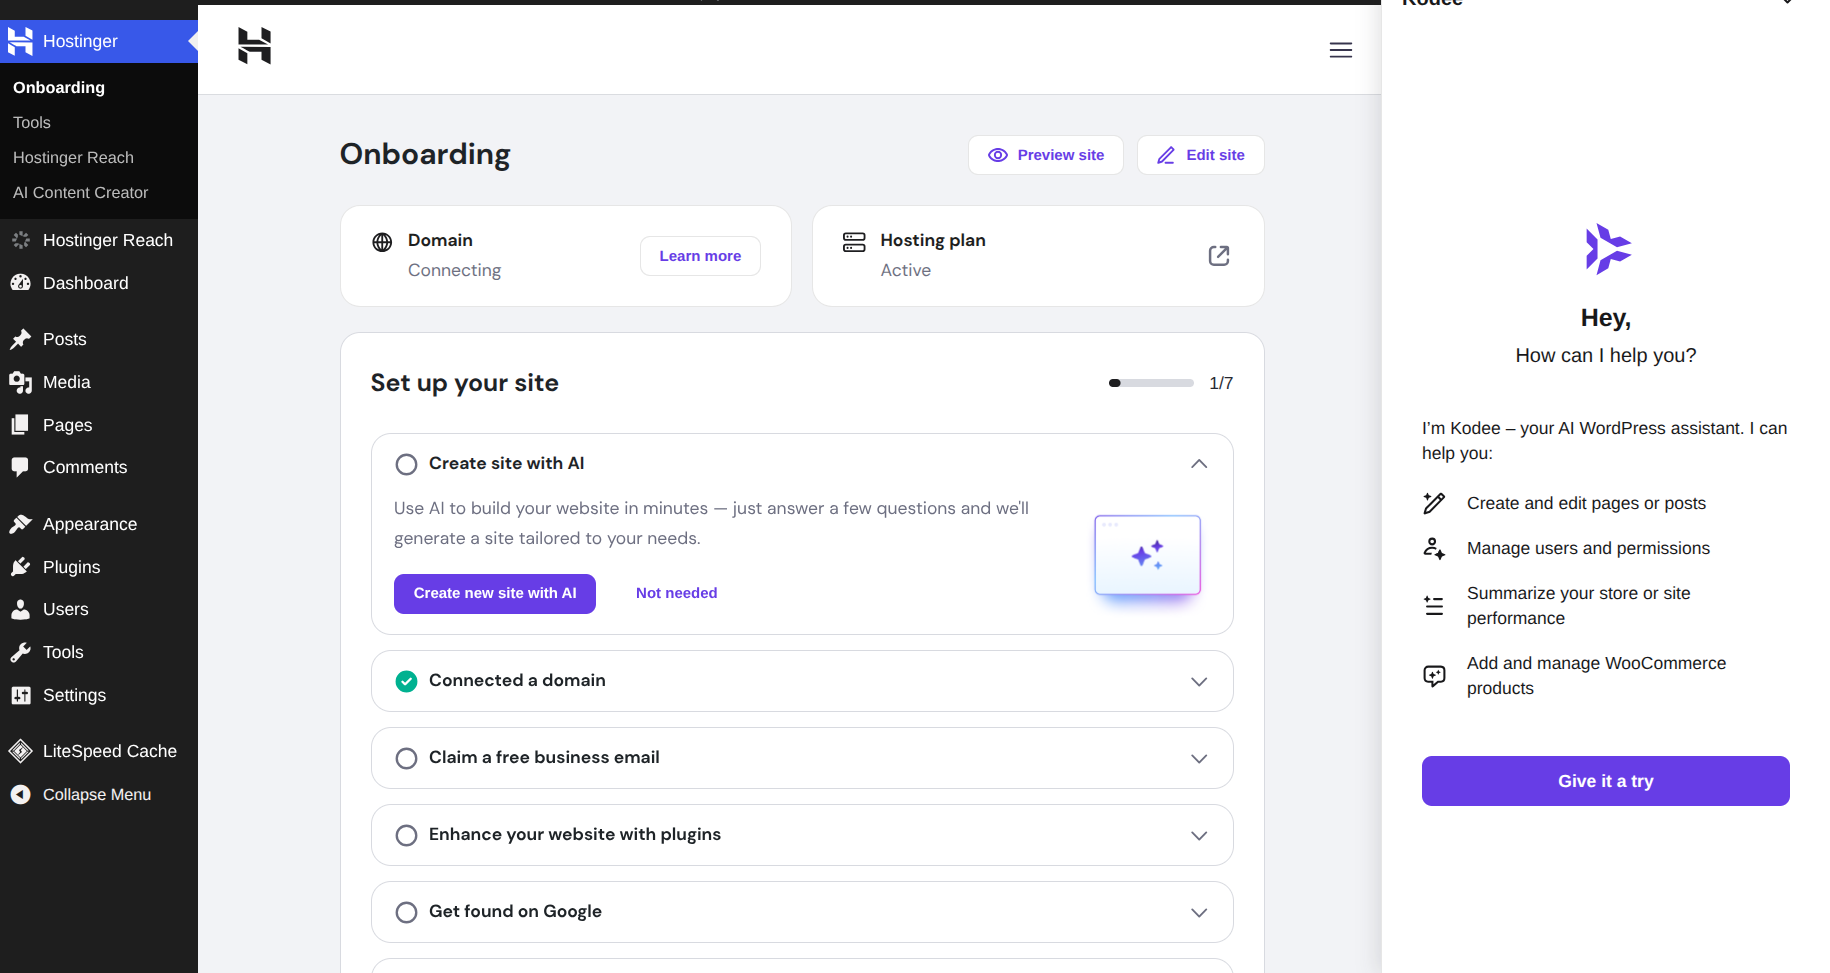
If the checklist pushes Create site with AI again and you already chose scratch, click Not needed and move on. Optional items such as free business email, plugin suggestions, and “get found on Google” are useful later. They are not blockers for writing your first draft post.
Open the normal WordPress menu on the left for Posts, Pages, Appearance, Plugins, and Settings. That classic admin is still the center of daily blogging work. Hostinger’s tools and AI assistant sit beside it as extras, not replacements for learning core WordPress habits.
What to do in the first hour after install
Change the site title and tagline under Settings > General. Set permalinks to Post name under Settings > Permalinks so URLs stay readable. Install a lean theme you can actually maintain, then add only the plugins you need for SEO, security, and caching. COMPROMATH’s WordPress plugins guide helps you avoid stacking five tools that do the same job.
Confirm SSL shows as secure in the browser. Hostinger usually provisions certificates automatically, but subdomain DNS must finish connecting first. Create one About page and one real first post before you chase widgets and color schemes. Empty blogs look unfinished to both readers and crawlers.
Turn on a backup habit early. Hostinger includes host-level backups on many plans, yet an offsite WordPress backup or restore path still helps when you want recovery independent of one provider. MigraSync is one careful option if you want cloud backup and restore for WordPress after the site is live. If this WordPress install will replace an old Blogger archive, plan content import and redirects with COMPROMATH’s Blogger to WordPress transfer guide instead of publishing on two competing URLs forever.
Honest tradeoffs to expect
Value versus renewal. Hostinger’s intro pricing is competitive for beginners. Renewal is higher. Budget year two before you celebrate year one. That honesty keeps this guide useful instead of salesy.
Shared resources. Budget shared hosting packs many sites onto shared pools. A quiet niche blog is usually fine. A sudden viral spike or heavy page builders can expose limits. Upgrade paths and caching exist. Magic unlimited claims do not.
AI shortcuts. AI site builders save time for demos. They rarely replace a clear niche, original posts, and a theme you understand. Scratch installs age better for long-term blogs.
Free subdomain versus brand domain. Free subdomains are excellent for experiments. Public brands usually deserve a root domain readers can remember. You can start on a subdomain and map the brand domain later if DNS is handled carefully.
Quick checklist
- Active Hostinger websites plan with available site slots
- Add website from hPanel > Websites
- Choose root domain, free subdomain, or temporary domain
- Set admin email and a unique strong password
- Prefer Build from scratch for a serious blog
- Wait for install, then verify Preview site loads
- Set permalinks, SSL, theme, essential plugins, and first post
- Enable backups before heavy theme and plugin experiments
Frequently asked questions
Is Hostinger good enough for a new WordPress blog? For most beginners and early niche sites, yes. It is easy, affordable on promo terms, and WordPress-ready. Confirm renewal math and resource limits for your growth plan.
Do I need the AI website builder? No. Build from scratch if you want a normal blank WordPress install you control.
Can I use a domain I bought elsewhere? Yes. Point DNS or nameservers as Hostinger shows for external domains, then wait for propagation.
How long until the site is public? WordPress itself often installs in minutes. Domain connecting can take longer depending on DNS. Preview the site and recheck SSL after the domain status turns active.
What if I still prefer free hosting? Read COMPROMATH’s notes on free WordPress hosting and the budget WordPress blog path so you understand the tradeoffs before you skip paid hosting.
Final thoughts
Creating a WordPress blog on Hostinger is mostly a guided click path in 2026. Add a website, choose the right address, set a strong admin password, install with Build from scratch, then finish SSL, permalinks, and your first real post. Treat Hostinger as a practical starter host, not a forever promise. When traffic, revenue, or complexity grows, reassess with the same honesty you used on day one.
Ready to start? Open Hostinger, complete plan checkout, and follow the seven on-screen steps above. After the site is live, grow traffic with useful posts and COMPROMATH’s organic traffic guidelines instead of rushing into every plugin upsell.

[…] not have WordPress yet, spin up a clean site first. A practical Hostinger walkthrough lives here. How to create a WordPress blog on Hostinger. Finish hosting, domain, and SSL before you import. Do not mix migration day with first-time […]
[…] haben, erstellen Sie zuerst eine saubere Website. Hier wohnt ein praktischer Hostinger Walkthrough. So erstellen Sie einen⟧ P0-Blog auf ⟦ Hostinger. Beende das Hosting, die Domain und SSL, bevor du importierst. Mischen Sie den Migrationstag nicht […]
[…] n avez pas encore WordPress, creez d abord un site propre. Un tutoriel Hostinger pratique est ici. Comment creer un blog WordPress chez Hostinger. Terminez hebergement, domaine et SSL avant d importer. Ne meleez pas le jour de la migration avec […]