Moving a blog from Google Blogger to self-hosted WordPress is one of those projects that looks simple on paper and gets messy in practice. The goal is always the same. Keep your posts, pages, comments, and images. Keep the organic traffic you already earned.
This guide is the full path I recommend in 2026. Export your Blogger data through Google Takeout, install MigraSync on WordPress, then import from your local .atom file. The screenshots below match the live Blogger, Takeout, and MigraSync screens so you can follow each click without guessing.
Quick honesty. Blogger gadgets and custom Blogger theme XML do not import into WordPress. Themes and layout plugins are different systems. Posts, pages, comments, categories, and media can move cleanly when you use a proper Takeout backup and a migration tool built for this job.
What you need before you start
You need admin access to the Blogger blog you want to leave. You need a working WordPress site where the content will land. You need a MigraSync account so you can download the plugin and activate a license on that WordPress install.
If you do not have WordPress yet, spin up a clean site first. A practical Hostinger walkthrough lives here. How to create a WordPress blog on Hostinger. Finish hosting, domain, and SSL before you import. Do not mix migration day with first-time hosting setup if you can avoid it.
Also keep the Blogger blog public and unchanged while you export. Do not delete posts, switch the blog to private, or move custom domains until migration finishes and you have verified the WordPress copy.
Why MigraSync instead of the old Blogger Importer
WordPress still ships a classic Blogger Importer path. It can work for tiny blogs. It falls apart when the export is huge, images stay on Google servers, featured images never land in the Media Library, or you forget 301 redirects and start collecting 404s in Search Console.
MigraSync is built for Blogger to WordPress as a product workflow. You upload a Google Takeout file (recommended) or use the Blogger API for small blogs. It imports posts, pages, comments, categories, and images, then gives you import options that matter for SEO and layout cleanup. That is the path this article documents step by step.
Part 1. Export your Blogger blog with Google Takeout
MigraSync’s smoothest mode is Local file (Google Takeout). That means you download your blog archive once, find the .atom file, and upload it to WordPress. Google rate limits no longer throttle the whole migration the way API imports can.
Step 1. Open Back up content in Blogger Settings
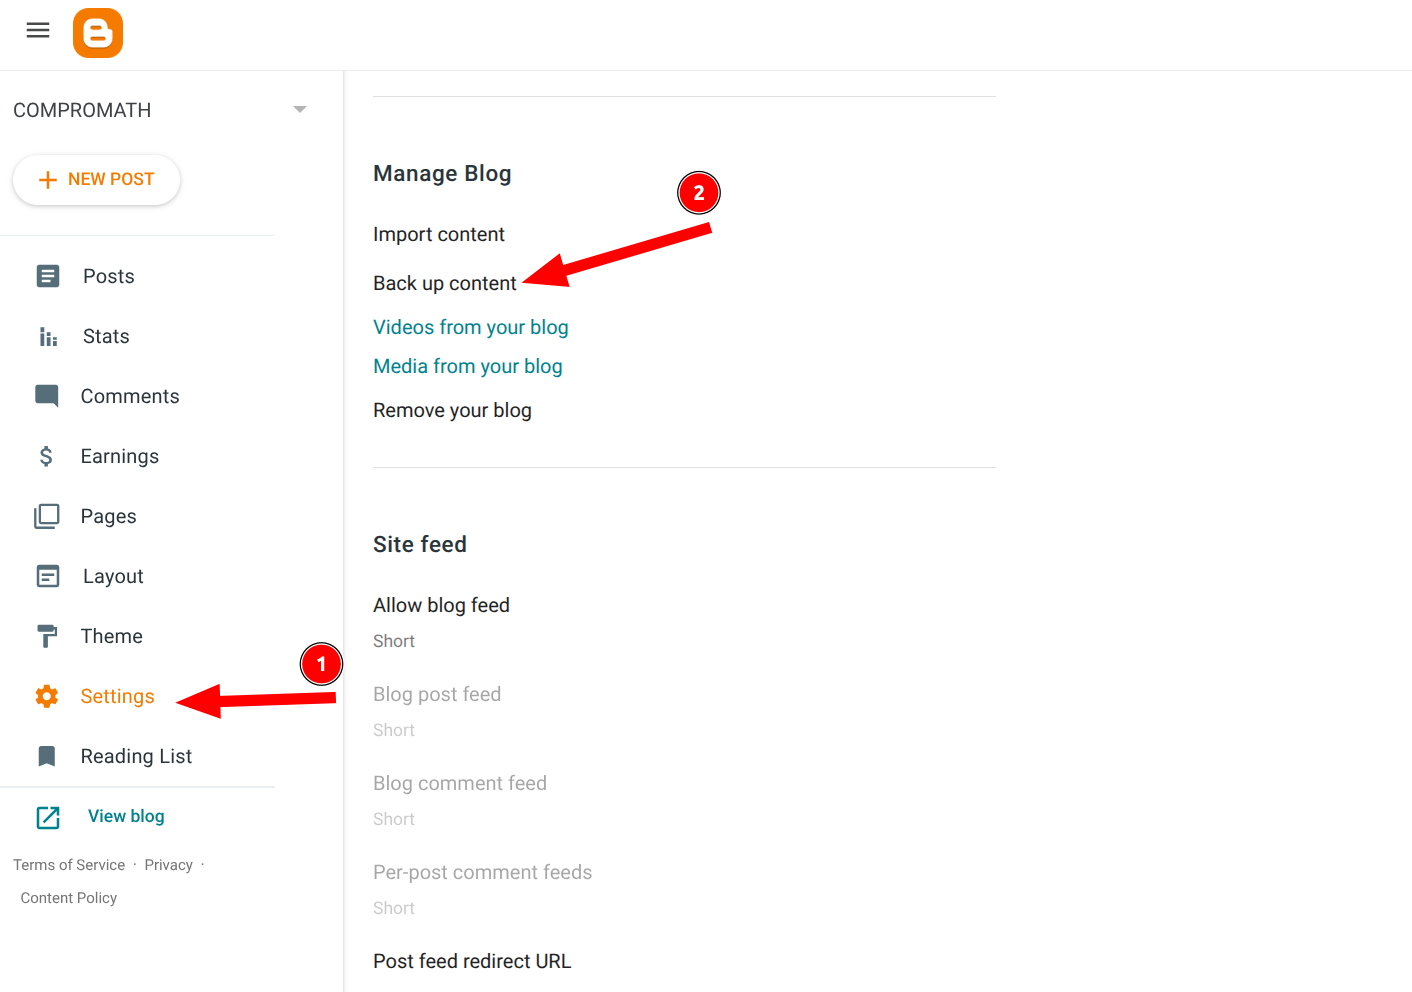
Sign in at blogger.com. Open the blog you want to migrate. Go to Settings, then under Manage blog click Back up content.
Step 2. Click Download to start Google Takeout
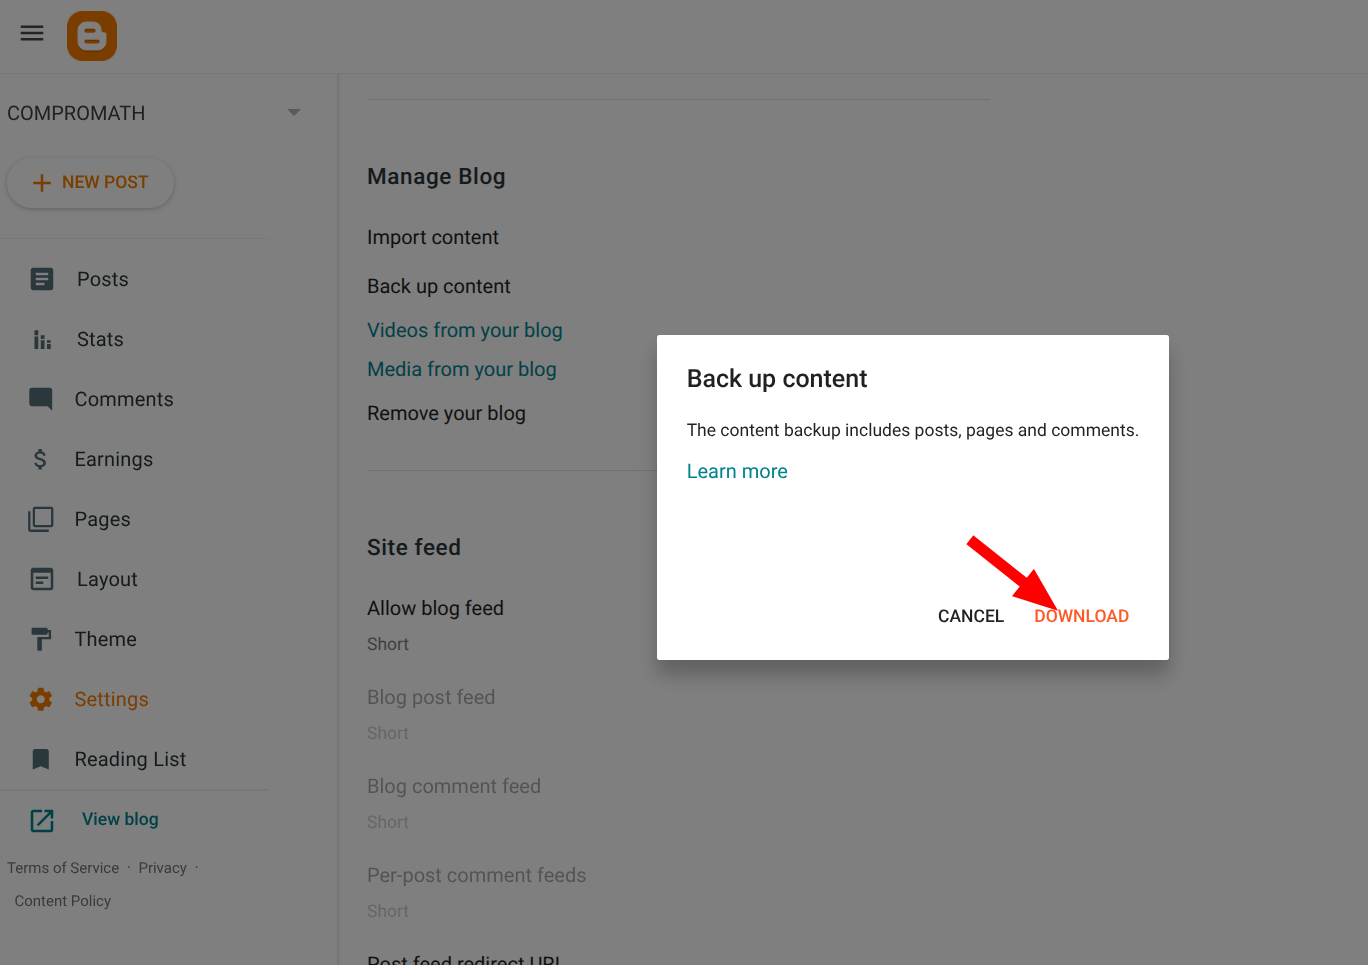
A modal appears for backing up posts and pages. Click DOWNLOAD. Blogger hands you off to Google Takeout so you can export the full blog package, not only a thin XML snippet.
Step 3. Confirm Blogger is selected in Takeout
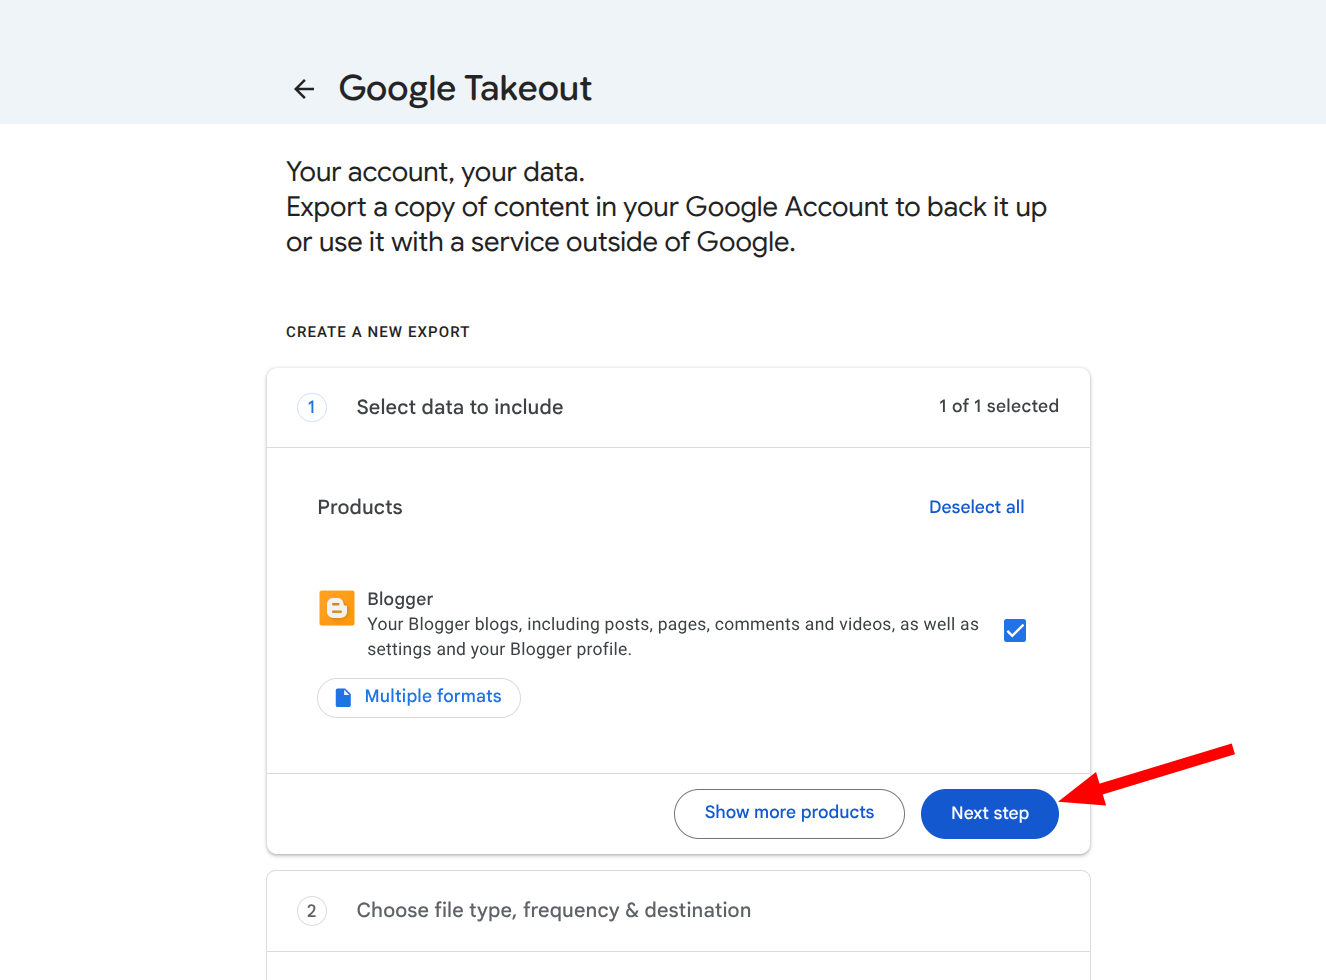
On the Takeout product screen, make sure the Blogger checkbox is selected. The description should cover your Blogger blogs, including posts, pages, comments and videos, as well as settings and your Blogger profile. Click Next step.
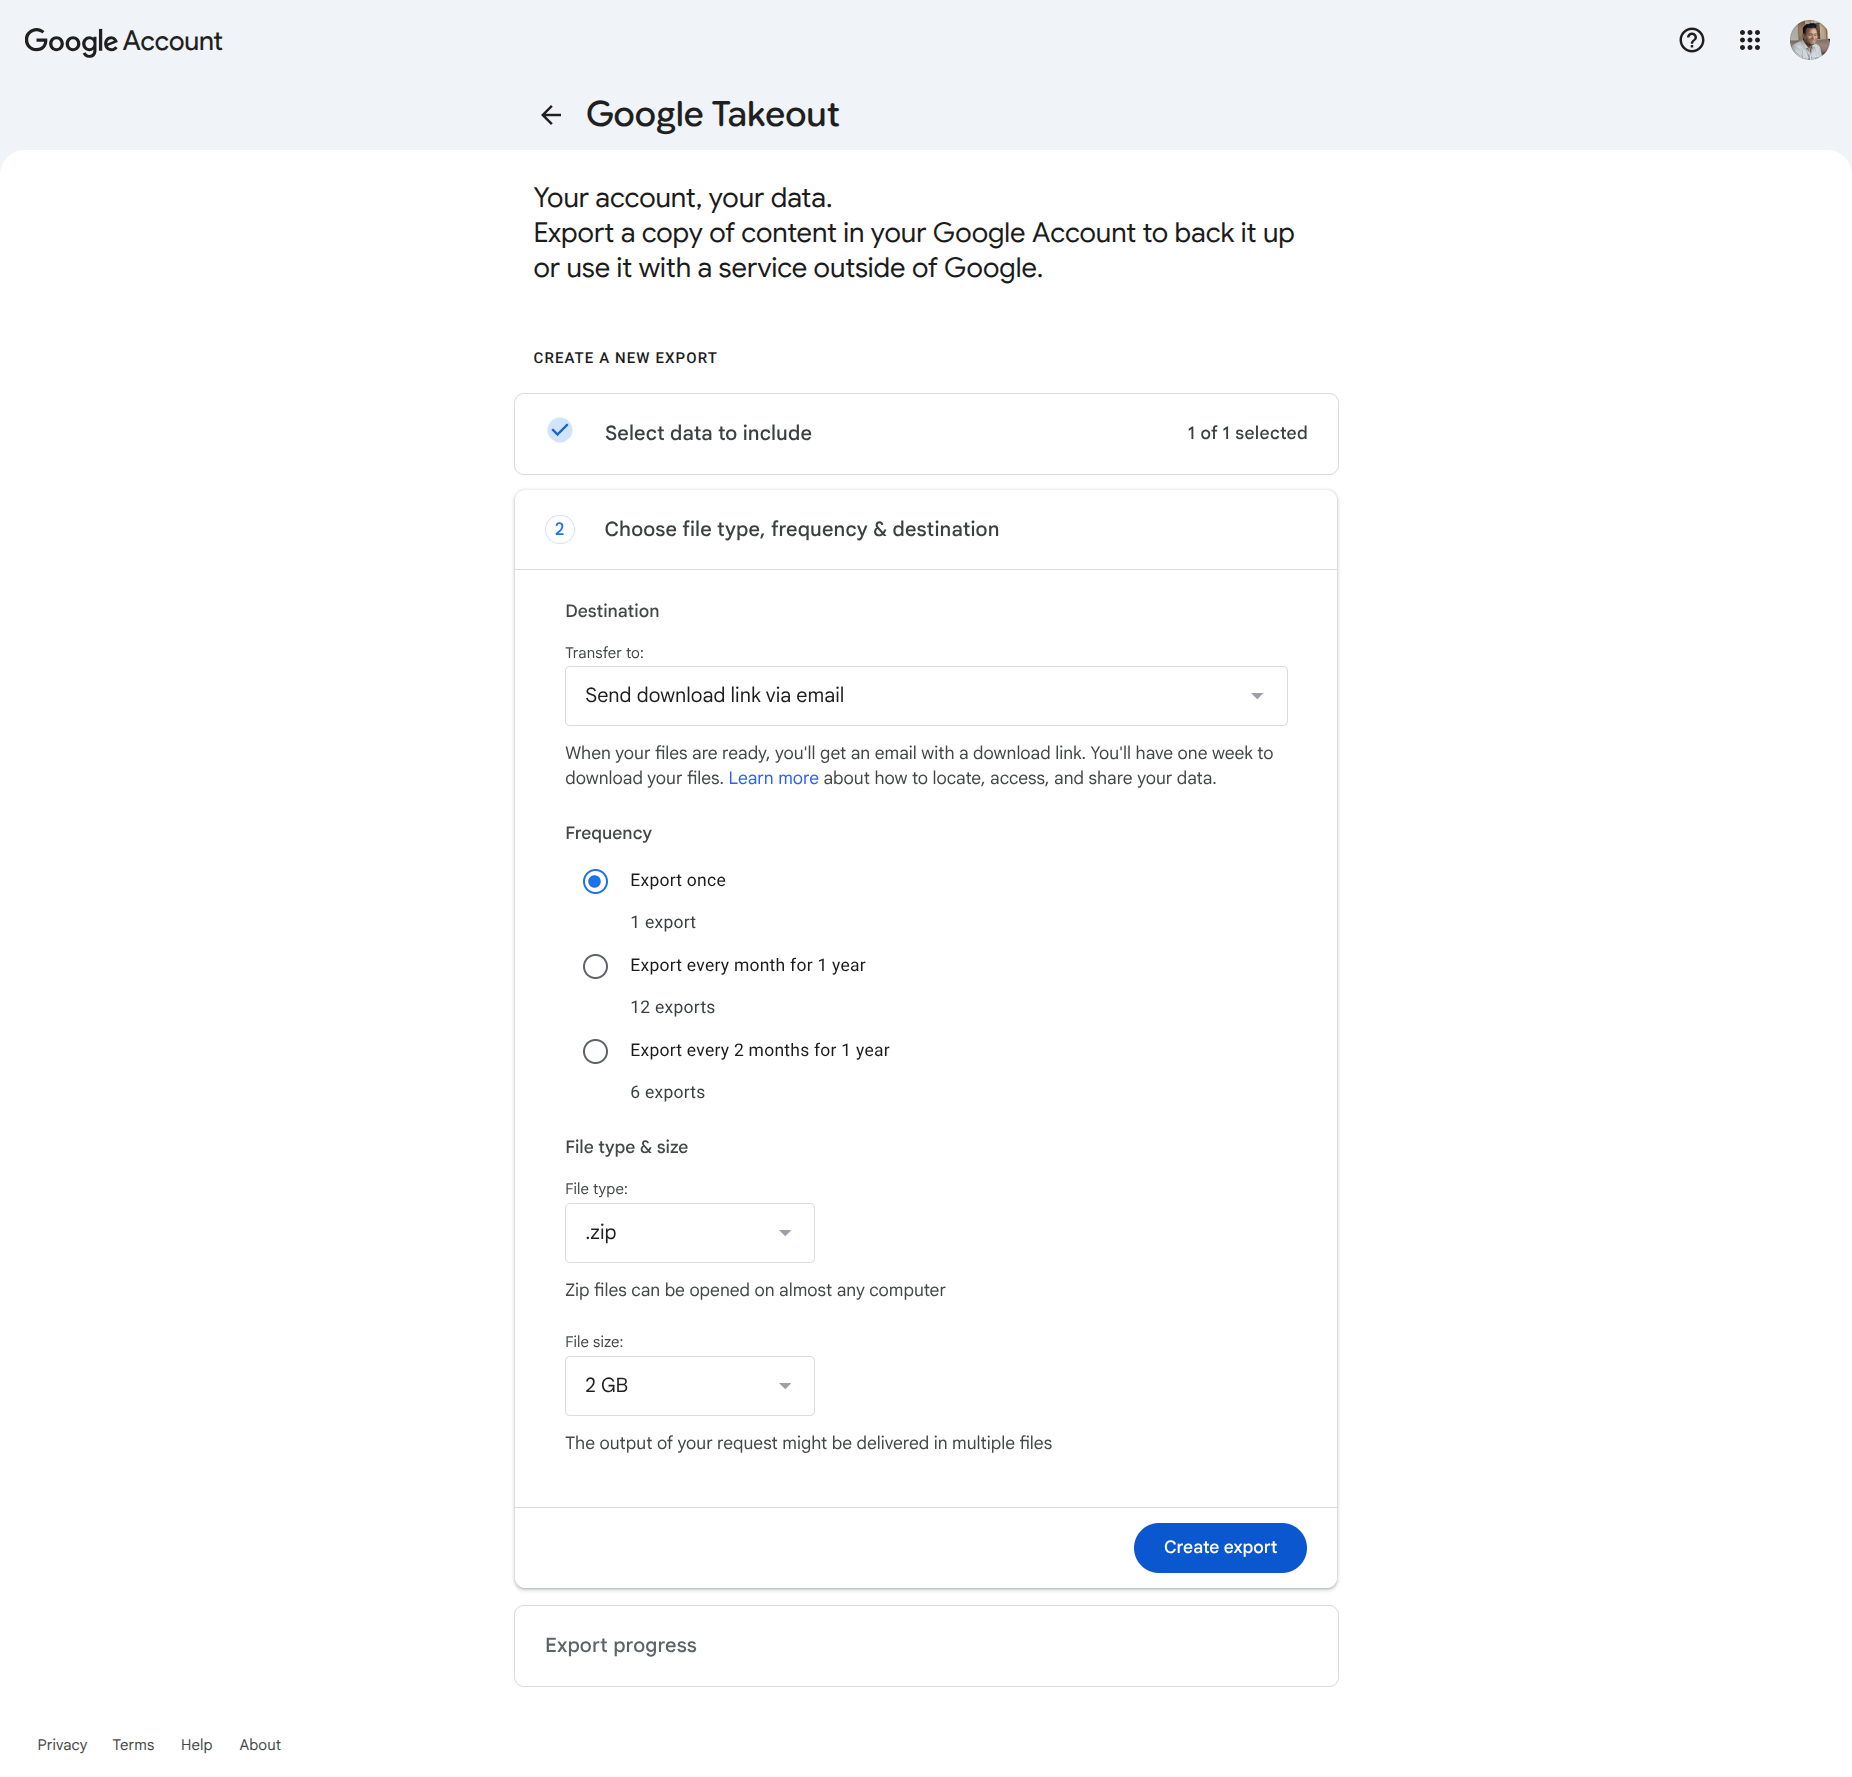
Step 4. Choose email delivery, export once, and zip
Under destination, choose Send download link via email. Set frequency to Export once. Under file type and size, keep .zip. Then click Create export.
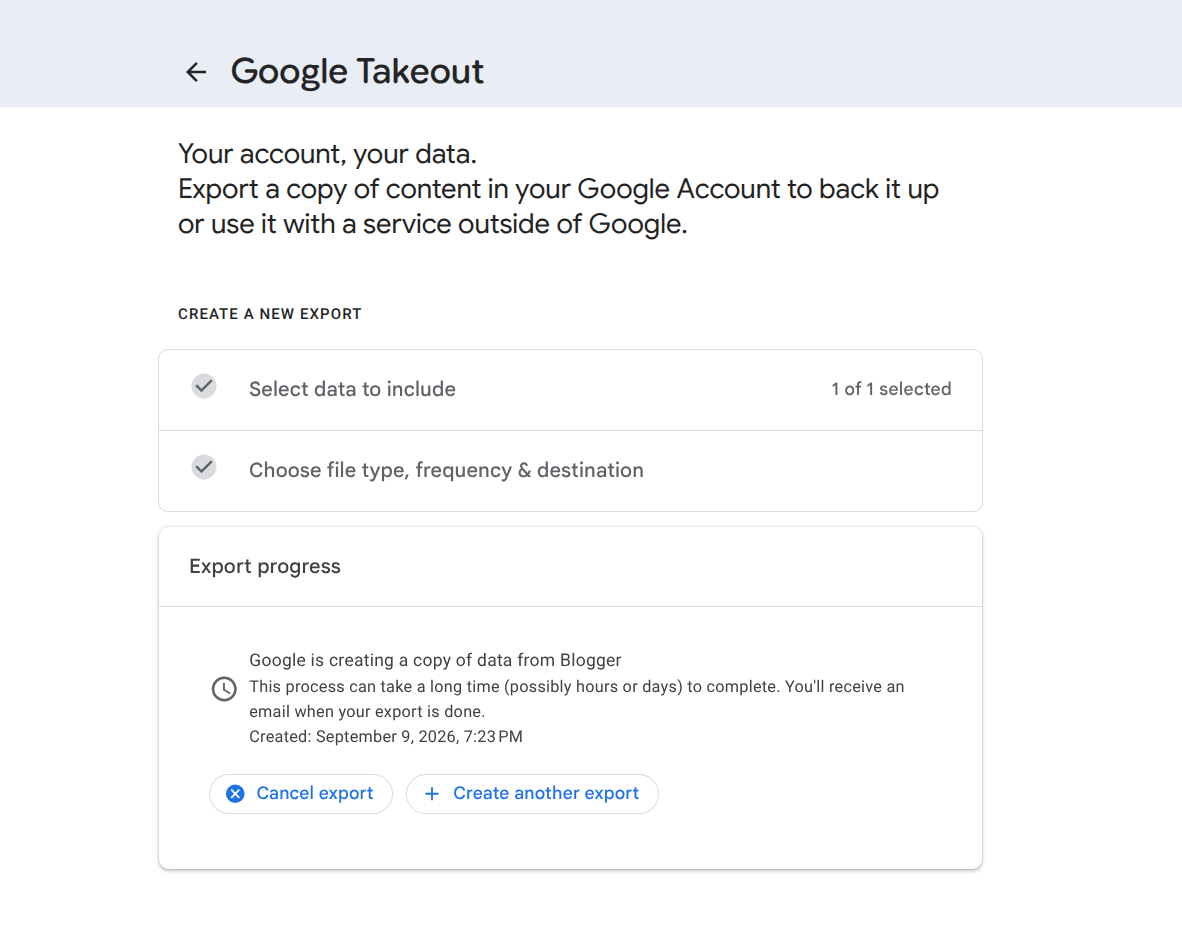
Step 5. Wait while Google builds the archive
Takeout shows a progress screen while Google packages your data. Small blogs finish quickly. Large blogs with years of posts and media can take longer. Leave the request alone and watch your email inbox.
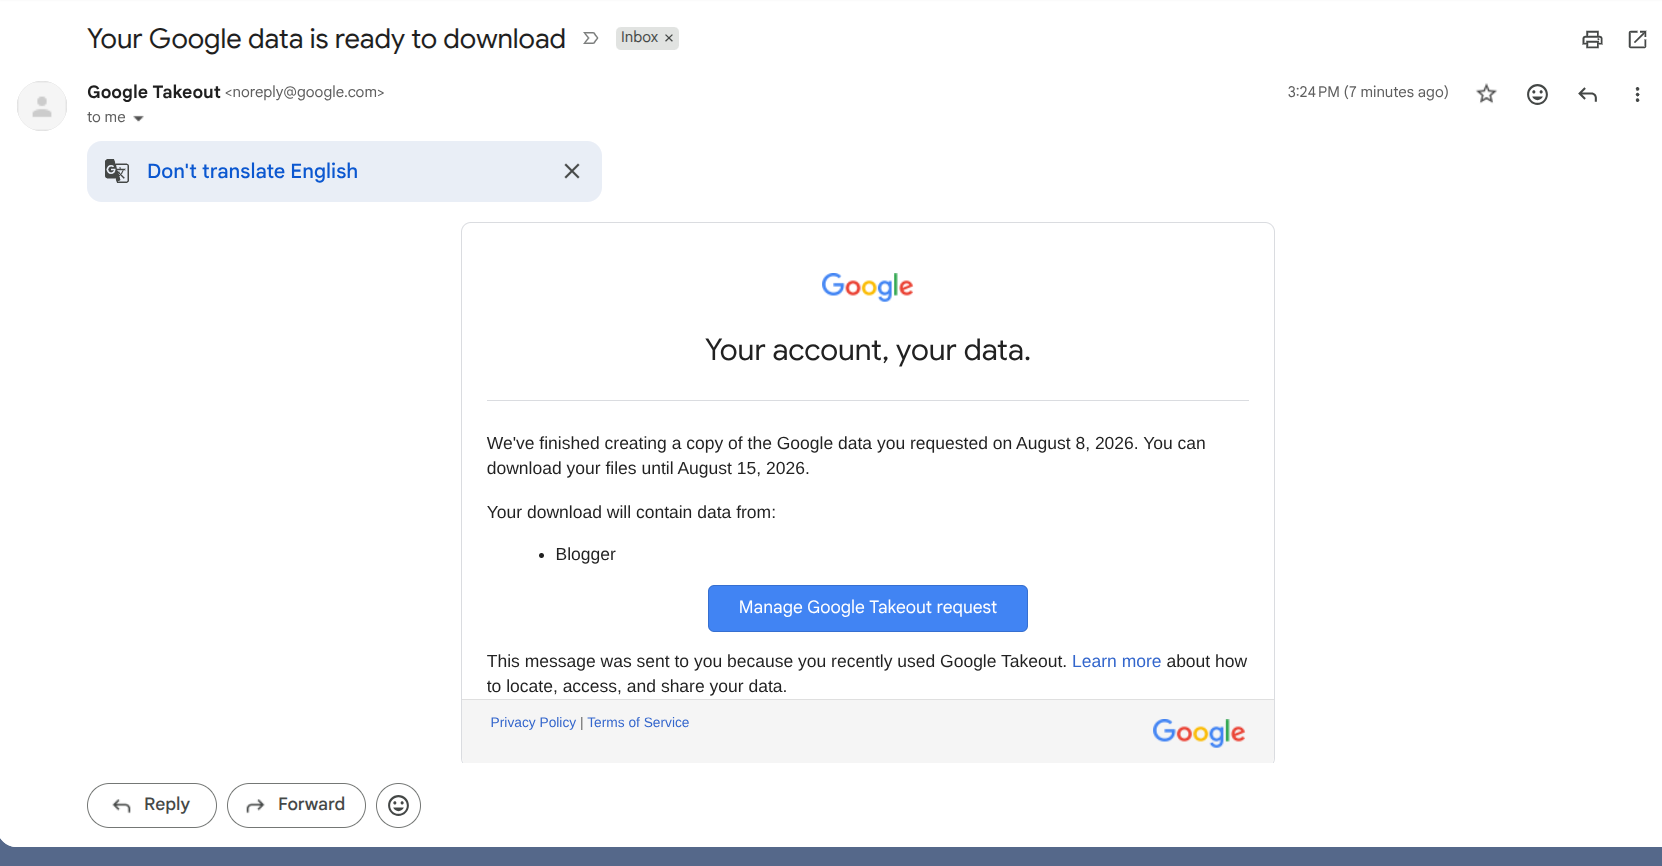
Step 6. Open the ready email from Google
You will get a message titled something like Your Google data is ready to download. Open it and click Manage Google Takeout request (wording can vary slightly by account language).
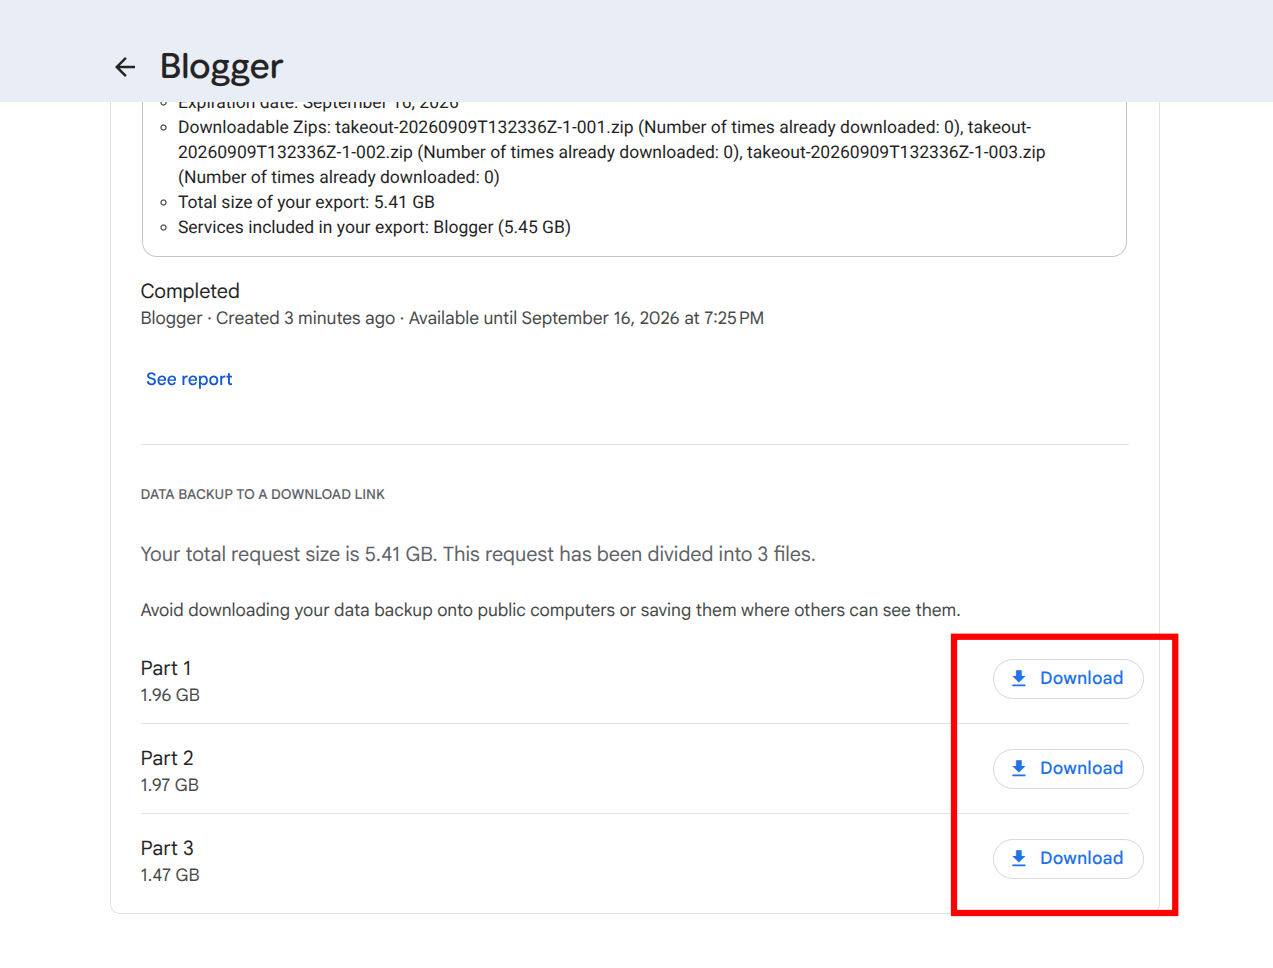
Step 7. Download every zip part to your computer
On the Takeout download page you will see one or more zip links. Large blogs often split into several parts. Download all of them to your laptop, then unzip every archive into one folder so the directory tree is complete.
Step 8. Find the.atom file for your blog
Inside the unzipped Takeout folder, open the directory named after your blog. Search for a file ending in .atom. That file is the importable Blogger feed MigraSync scans. Keep the zip nearby as a backup, but prefer uploading the .atom file later for a faster upload and scan.
If you manage several Blogger blogs under one Google account, Takeout may include more than one blog folder. Match the folder name to the blog you intend to move before you upload anything.
Part 2. Set up WordPress and MigraSync
Step 9. Sign up and download the MigraSync plugin
Create your account at migrasync.com, pick the plan that fits your blog size, and open the customer dashboard. Download the MigraSync WordPress plugin zip from there. Keep the license key handy for activation after install.
Step 10. Install and activate MigraSync on WordPress
In your WordPress admin go to Plugins > Add New > Upload Plugin. Upload the zip, install, then activate. Enter your license when prompted so the migration modules unlock.
Need a fresh WordPress home first? Use the Hostinger guide linked earlier. Create a WordPress blog on Hostinger. A stable host, SSL, and permalinks set to a clean post-name structure make the migration less painful later.
Step 11. Purge existing WordPress content if you want a clean slate
If this WordPress site still has sample posts, demo pages, or leftover test content, open MigraSync and use the purge option to clear existing WordPress content before import. Skip this if the site already has content you must keep. Purging is for empty or staging sites where you want Blogger to become the only source of truth.
Part 3. Run the Blogger migration in MigraSync
Step 12. Open Blogger Migration
From the MigraSync plugin menu, click Blogger Migration. That starts the guided flow for Takeout files and API imports.
Step 13. Choose Local file (Google Takeout)
Select Local file (Google Takeout). This is the recommended path for most blogs. It is faster and smoother because the heavy export already happened on Google’s side.
You will also see a Google Blogger API option. That can work for small blogs. Google limits how many API requests a migration can make each day, so larger blogs often stall or need multiple sessions. Prefer Takeout unless you have a tiny site and want a live API pull.
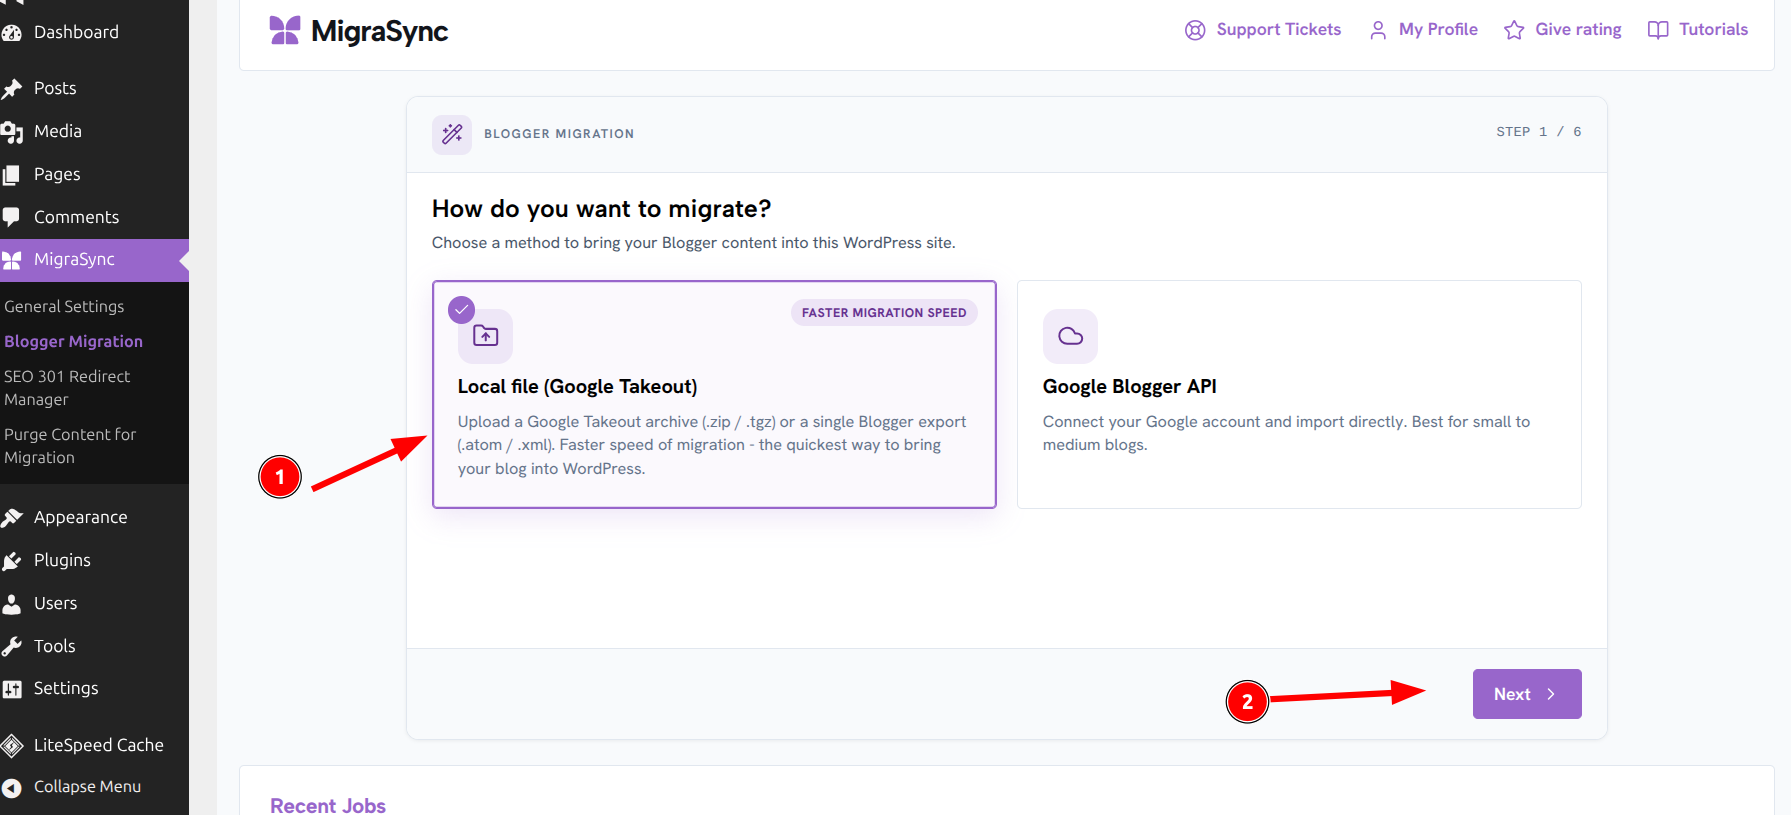
Click Next after you pick Local file.
Step 14. Upload your.atom file and scan
Click Choose file(s) and select the .atom file from your blog folder. You can upload the downloaded zip instead, but the .atom file is recommended for faster upload and migration. Then click Upload & scan.
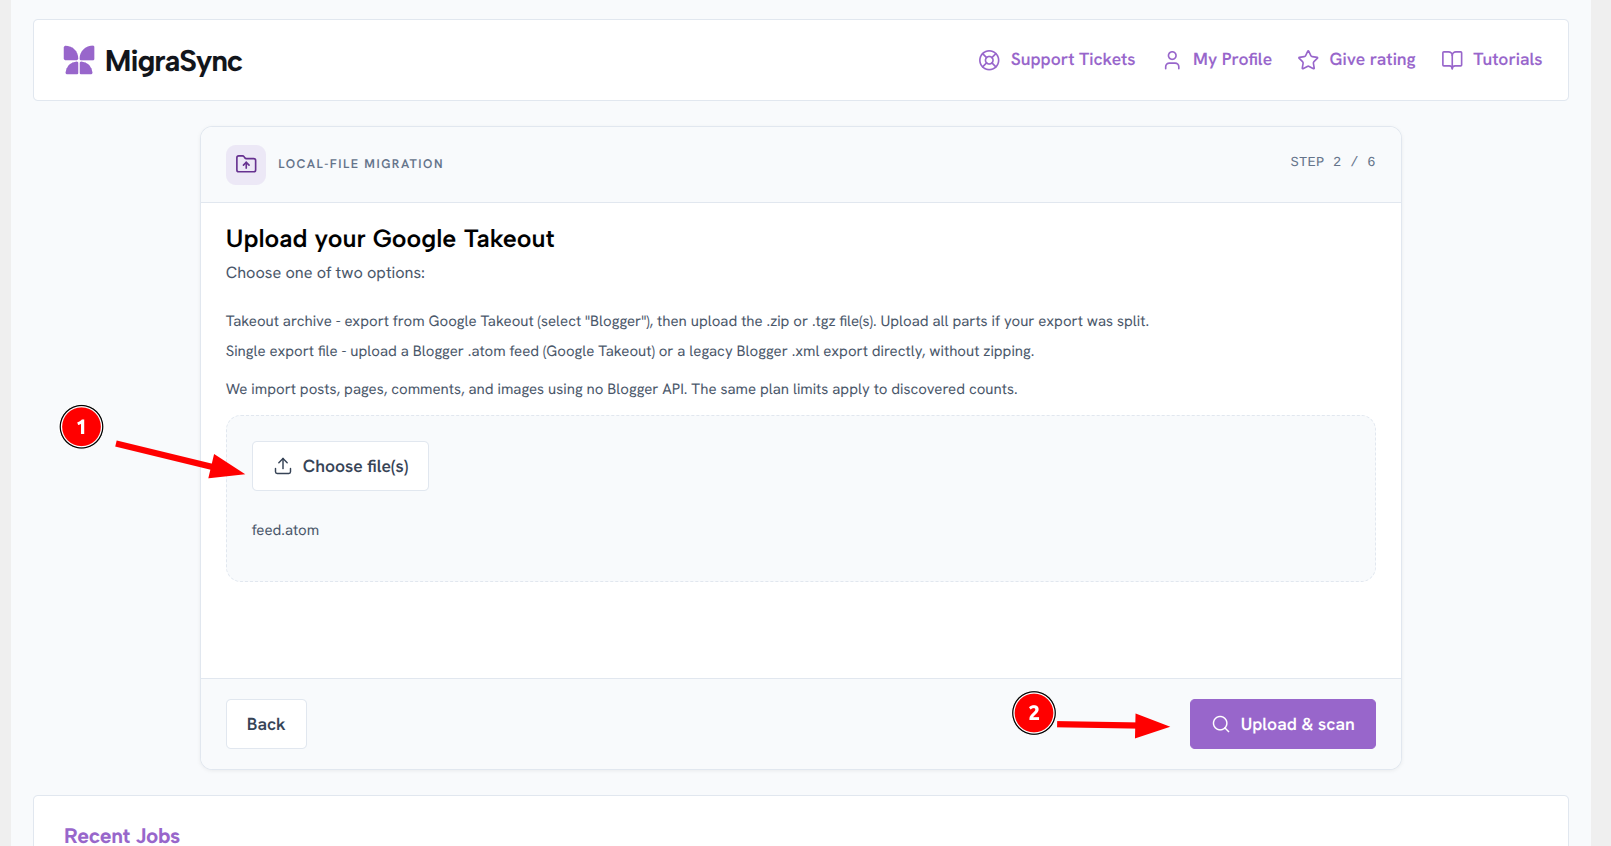
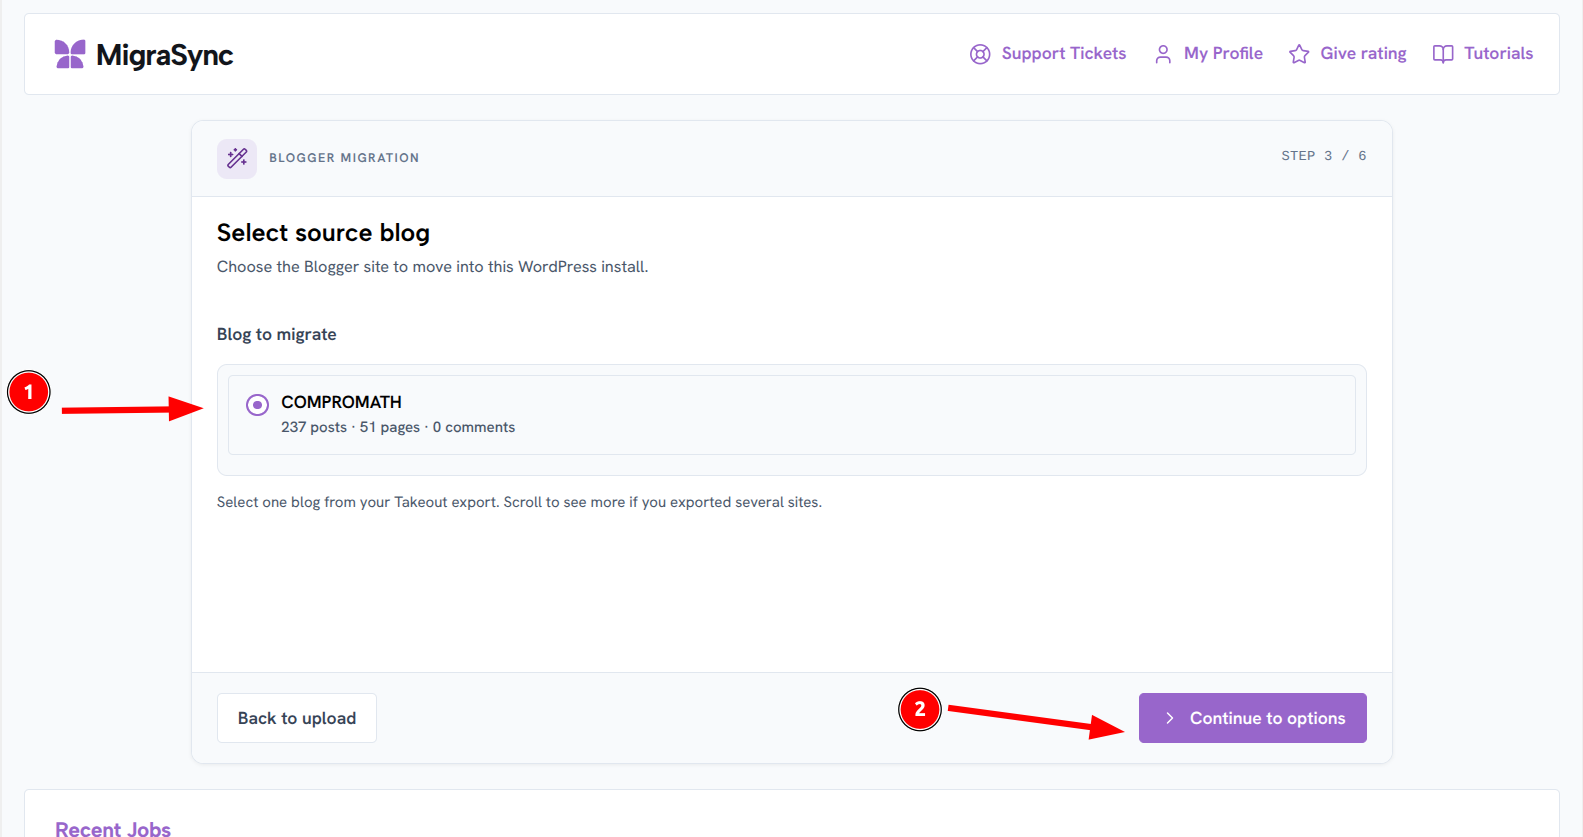
Step 15. Select your blog and continue to options
After a successful scan you will see blog details such as blog name plus counts for posts, pages, and comments. Select the correct blog if more than one appears, then click Continue to options.
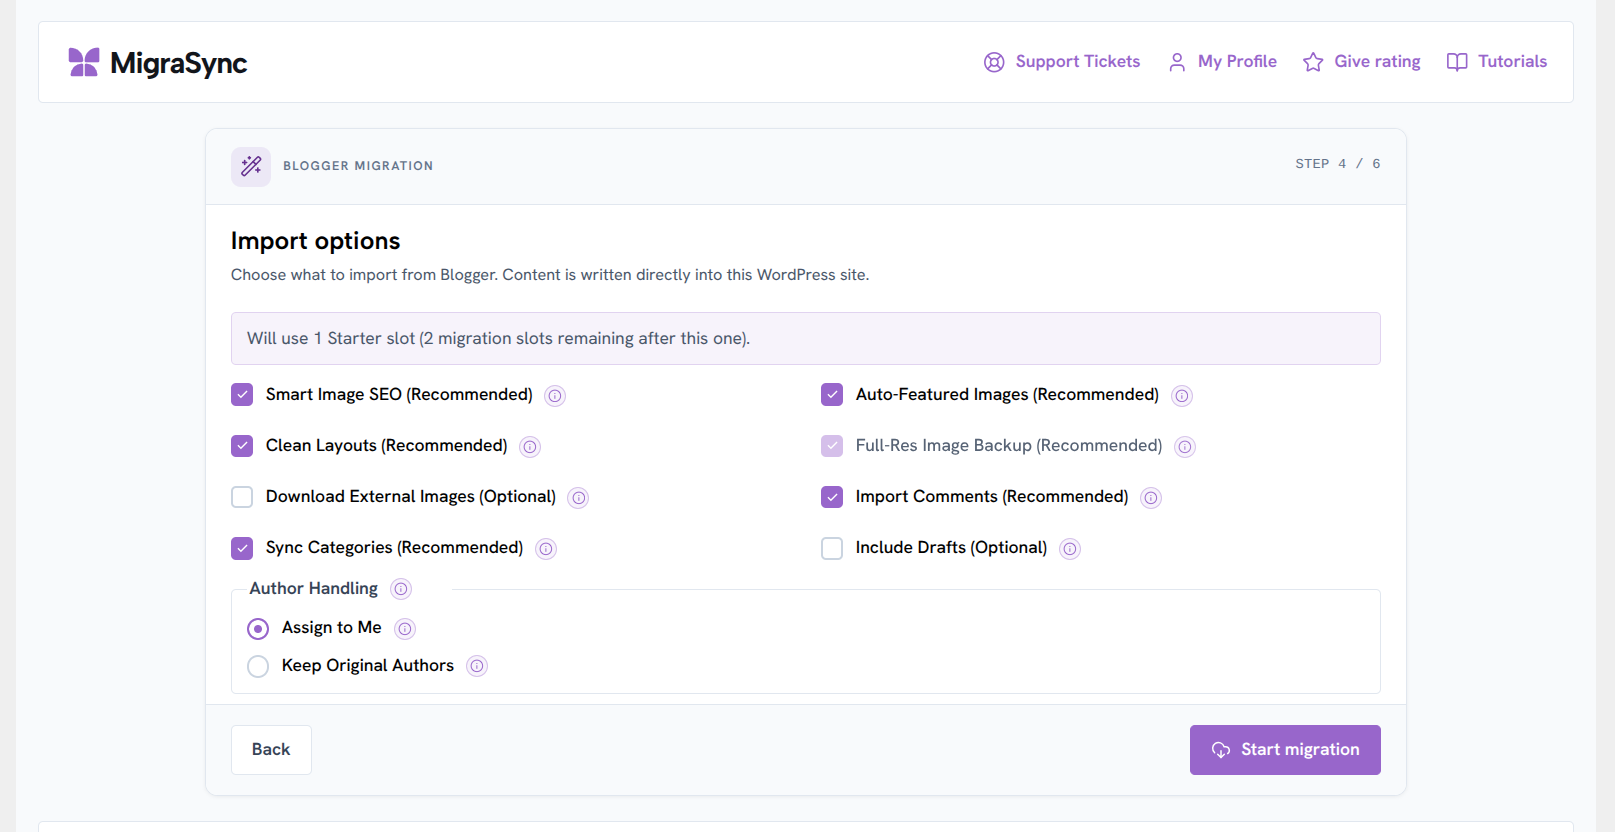
Step 16. Review import options before you start
The Import options screen is where you decide how media, comments, drafts, and authors land in WordPress. Recommended items are usually checked by default. Adjust them to match your blog.
- Smart Image SEO (Recommended). Improves image handling for search-friendly media.
- Auto-Featured Images (Recommended). Sets featured images from post media when possible.
- Clean Layouts (Recommended). Tidies Blogger layout leftovers that look messy in WordPress themes.
- Full-Res Image Backup (Recommended). Pulls full-resolution images into your Media Library.
- Download External Images (Optional). Useful when posts hotlink images hosted elsewhere.
- Import Comments (Recommended). Brings comment threads with the posts.
- Sync Categories (Recommended). Maps Blogger labels into WordPress categories.
- Include Drafts (Optional). Turn on only if you want unpublished drafts too.
- Author Handling. Choose Assign to Me or Keep Original Authors depending on whether old co-authors should remain visible.
Step 17. Start migration and stay on the page
Click Start Migration. Progress appears on screen. Keep that browser tab open. Leaving the page or starting heavy WordPress edits mid-import can slow things down or create confusion about what finished.
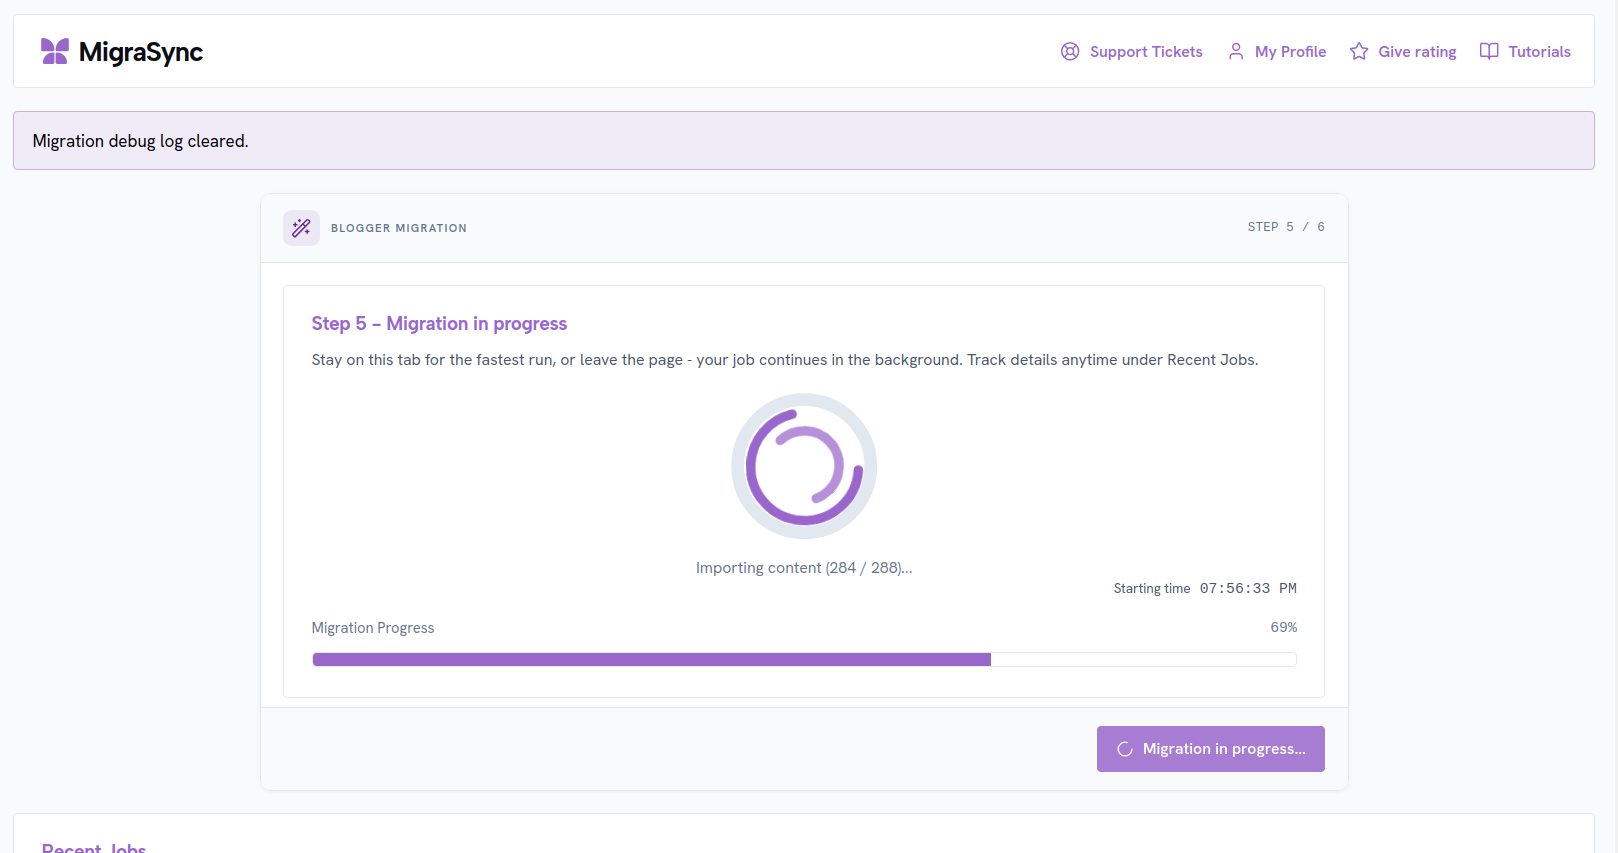
Runtime depends on posts, pages, media, and comments. A small blog can finish in minutes. A large archive with years of images takes longer. Do not redesign the theme, bulk-edit posts, or change permalinks until the job completes.
Step 18. Confirm the completion report
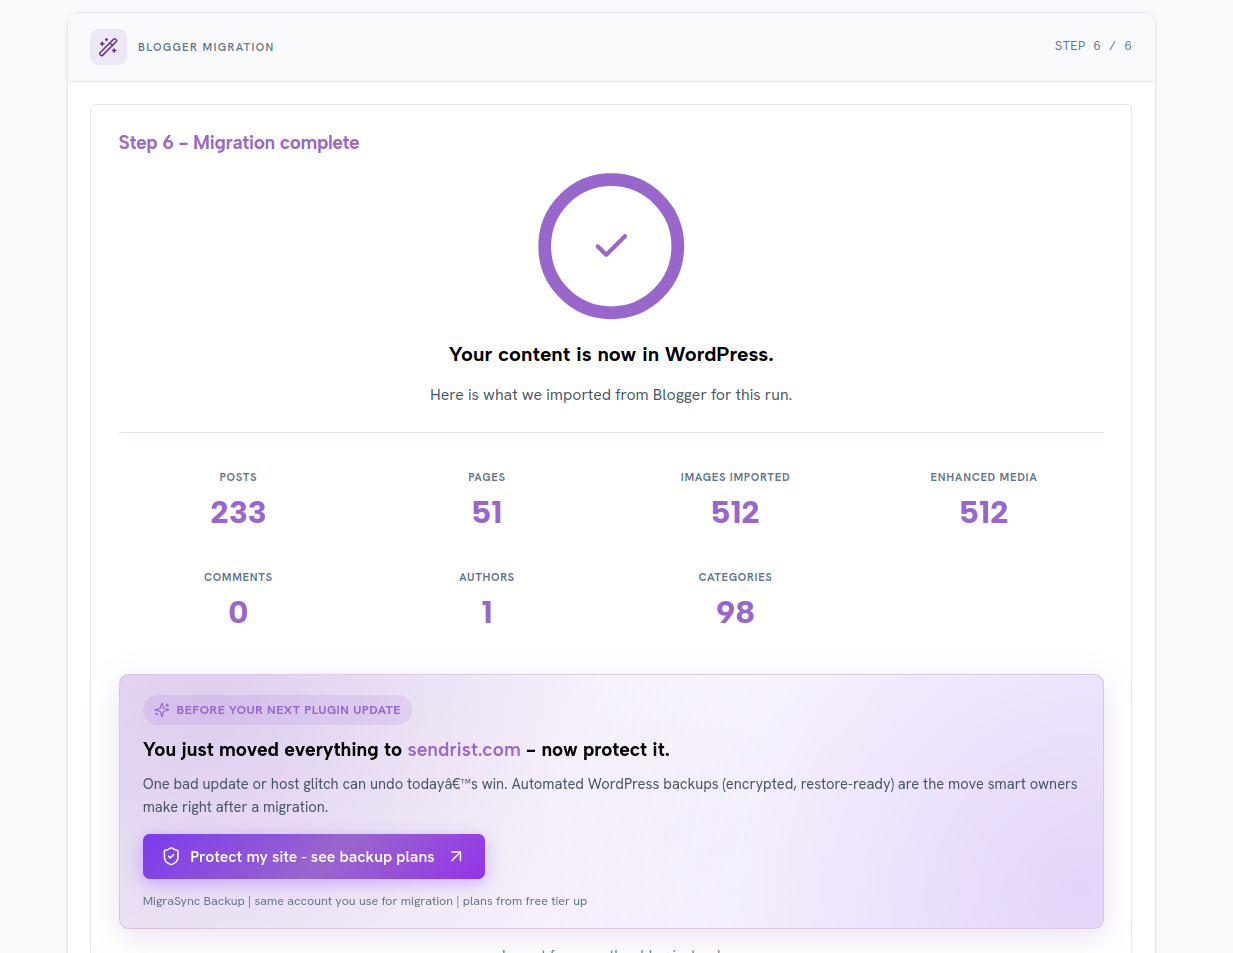
When migration finishes, MigraSync shows a completion report with counts for what moved. You should also get an email confirmation with the migration report. Spot-check a few posts, a page, a comment thread, and the Media Library before you touch DNS or custom domains.
After migration. Protect your rankings
Importing content is only half the job. Search engines still know your old Blogger URLs. Map them to the new WordPress permalinks with 301 redirects so bookmarks and backlinks keep working. MigraSync includes redirect tooling for this stage. Use it before you retire the Blogger blog or point a custom domain away from Blogspot.
Then verify the WordPress property in Google Search Console, submit an updated sitemap, and watch Coverage and Page indexing for a few weeks. Fix any 404s quickly. Keep writing on WordPress only after redirects and spot checks look solid.
If you are still comparing platforms, these Compromath guides help with the bigger picture. Blogger vs WordPress for making money, WordPress hosting for bloggers, and organic traffic guidelines.
Common mistakes that break migrations
- Deleting or privatizing the Blogger blog before Takeout finishes and WordPress is verified.
- Uploading the wrong blog’s
.atomfile when one Google account owns several blogs. - Relying on the Blogger API for a large archive and hitting daily request limits.
- Editing themes, permalinks, or SEO plugins while the import is still running.
- Going live on a new domain without 301 redirects from old Blogger URLs.
Quick checklist
- Back up content in Blogger Settings and complete Google Takeout as a zip.
- Download every zip part, unzip, and locate your blog’s
.atomfile. - Prepare WordPress (Hostinger guide if you need a new site) and install MigraSync.
- Optional purge of existing WordPress content on a clean destination site.
- Blogger Migration > Local file (Google Takeout) > upload
.atom> scan. - Select the blog, set import options, start migration, wait for the report email.
- Spot-check content, configure 301 redirects, then update Search Console.
Final notes
A careful Takeout export plus MigraSync local import is the least stressful way I know to leave Blogger without abandoning years of work. Follow the screenshots in order, keep the browser tab open during migration, and only change DNS or custom domains after the completion report looks right.
When you are ready to run the import, start at migrasync.com. If you still need a WordPress home first, use the Hostinger WordPress setup guide, then come back to this checklist.
