How To Migrate Google Blogger to WordPress | Step By Step Guide
Migrating your blog from Google Blogger (also known as Blogspot) to WordPress might seem challenging and technical.
But, in this step-by-step guide, I’ll show you the easiest way to do it, as I’m an expert in both WordPress and Blogger. You can successfully transfer your blog from Blogger to a self-hosted WordPress platform without any trouble.
You can move your blog without losing your Google organic traffic, and you can even transfer the images and videos hosted on Blogger.
You may interest in – How to Start a Professional WordPress Blog for Just $35
One important thing to note is that you can’t import Blogger gadgets or plugins into WordPress. WordPress has its own system for plugins with different code.
Is it a better decision to move from Blogger to WordPress?
Deciding whether to switch from Blogger to WordPress depends on your needs. Both Blogger and WordPress are popular platforms for making your thoughts and writings available to online readers, whether they are familiar to you or not.
Both platforms have similar features. They both use “Post” for dynamic pages and “Page” for static ones. They have template designs known as “Themes,” and they support categories, labels, and tags. You can publish text, images, and videos on both.
However, WordPress is considered the top-notch platform for freedom and scalability. If you value these aspects, moving to WordPress is a great decision. On the other hand, blogging on Blogger is cost-effective and simpler.
20 Steps To Transfer Google Blogger to WordPress
1. Backup Blogger Posts, Images, Videos
The first and most important thing to do is to back up your current Blogger posts, images, and videos.
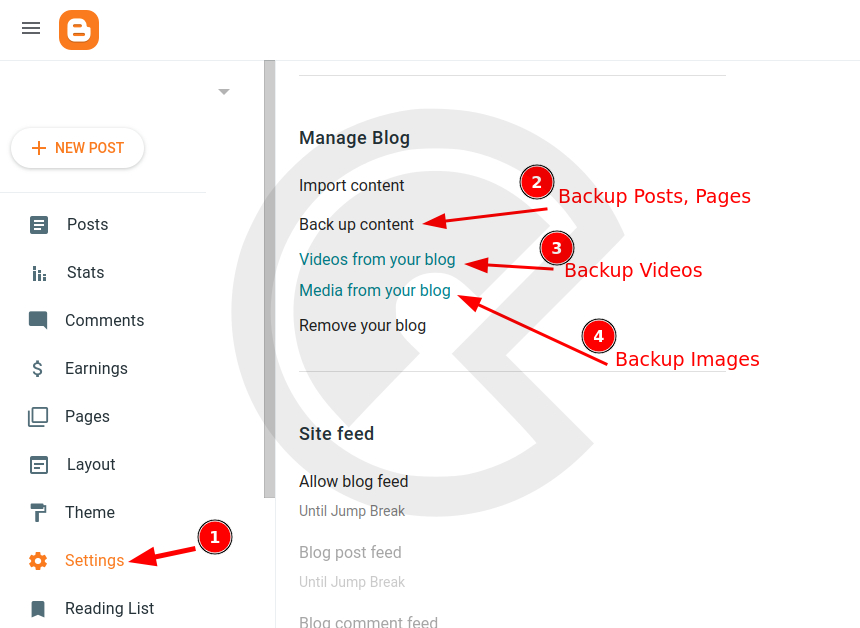
- Go to Blogger Dashboard → Settings
- Click on ‘Back up content‘ for saving all posts & pages as .XML file
- Click on ‘Videos from your blog‘ for downloading videos used in your blogger website.
- Click on ‘Media from your blog‘ for downloading all images used in your blog.
2. Backup Blogger Theme
The next step is to save your Blogger Theme. If you don’t want to use the same design for your WordPress blog, you can skip this step. However, backing up your Blogger Theme can be helpful if you want an expert to replicate the same design for your WordPress blog.
Please remember that trying to import a Blogger Theme directly into WordPress is not possible because WordPress has a different file structure and code for themes.
While a Blogger theme is contained in a single .XML file, a WordPress Theme is a zipped file containing multiple .PHP and other extension files. That’s why you’ll need to hire an expert who can recreate your Blogger Template design as a WordPress theme.
You also have the option to choose any WordPress theme you like. It’s not mandatory to keep the exact same design and appearance, but it’s recommended to maintain similar features and functions, along with consistent colors and typography.
To keep Blogger Theme backup follow these:
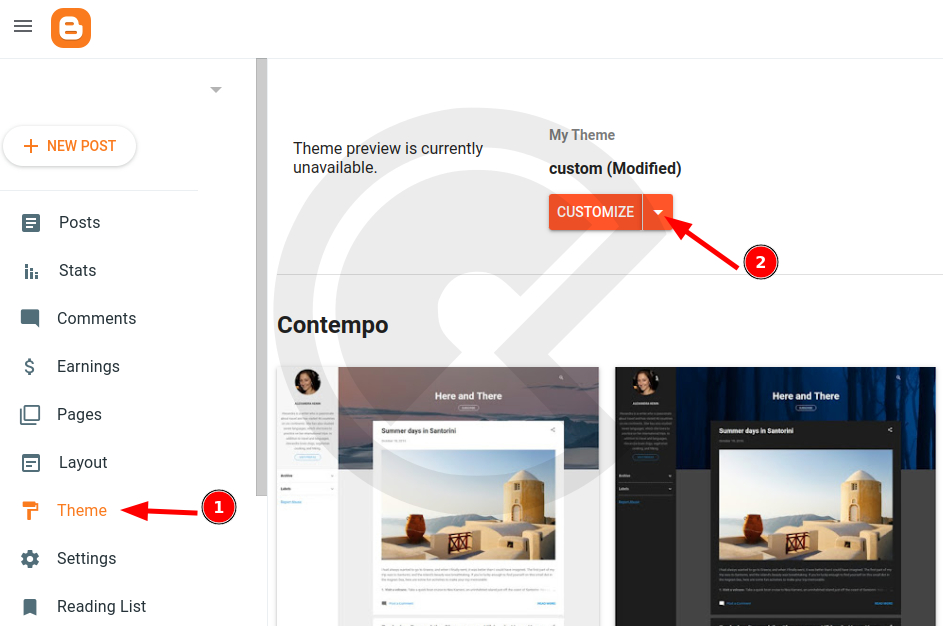
- Go to Blogger Dashboard → Theme
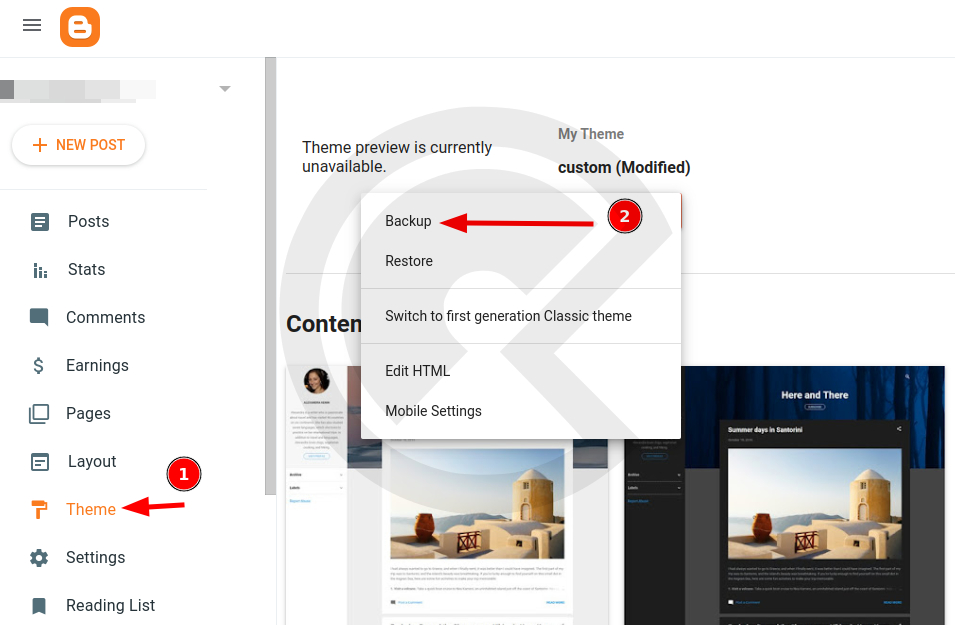
- Click on Arrow Icon and then click on ‘Backup‘ for saving Blogger Theme as .XML file
3. Backup Blogger Plugins & Gadget (Widget)
If you’re currently using Blogger gadgets or widgets, make sure to manually copy and paste them into your text editor to keep them safe. Importing these Blogger gadgets into WordPress is not possible.
These gadgets could include things like your Google Analytics code, advertisement code, embed code, iframe code, and so on.
You can use in WordPress from Dashboard → Appearance → Widgets after migration.
4. Ready WordPress Theme
Before moving to WordPress, it’s a good idea to prepare your WordPress Theme. If you want to maintain the same design and layout as your Blogger blog, you’ll need to hire experts and explain your requirements to them.
However, if you decide to change the design and appearance, that’s absolutely fine. You have the flexibility to do so. You can even choose from free or premium WordPress themes.
Premium WordPress themes are recommended for professional WordPress websites or blogs because they offer a premium look, advanced functionalities, and improved performance.
5. Ready Blogger Exported XML File
If the size of your exported Blogger XML file for posts and pages is under 20MB, you don’t have to worry. However, if it’s larger than 20MB, you might run into problems trying to import it into WordPress using the Official Blogger Import Plugin.
It’s essential not to use other import plugins because some untrusted ones may contain malicious script code that could harm your WordPress blog.
The default Blogger Import plugin has a drawback as it hasn’t been updated for a few years.
In this situation, you’ll need to pide your exported Blogger XML file into smaller parts, each under 20MB. If you’re not tech-savvy, it’s best to hire an expert who has experience with this task because splitting a Blogger XML file can be challenging, and there are no readily available XML split software solutions.
Alternatively, you can manually copy and paste each blog post into WordPress posts. While this method takes more time, it’s the most effective and safe approach.
6. Choose WordPress Hosting
Next, you’ll need to make a smart choice when it comes to selecting your WordPress blog hosting. It’s important to find a hosting provider that offers a smooth experience within your budget.
As a beginner on this platform, you’ll want the best hosting provider that makes launching your WordPress website easy, with features like staging mode, one-click WordPress installation, and free SSL.
I’ve identified the top 7 WordPress blog hosting options that offer these features while being budget-friendly. However, I recommend that before you purchase hosting, you should read this article in its entirety and then proceed with your decision.
7. Launch Staging website
When it comes to moving from one platform to another or switching from one hosting provider to another, it’s highly recommended to launch a staging website before making your actual website live.
Staging mode allows you to test and practice until you achieve the final desired output. Once everything is confirmed and works perfectly, you can easily switch from staging to live mode.
This migration ensures a smooth user experience for your current blog readers and visitors, and it’s also something search engines like Google appreciate.
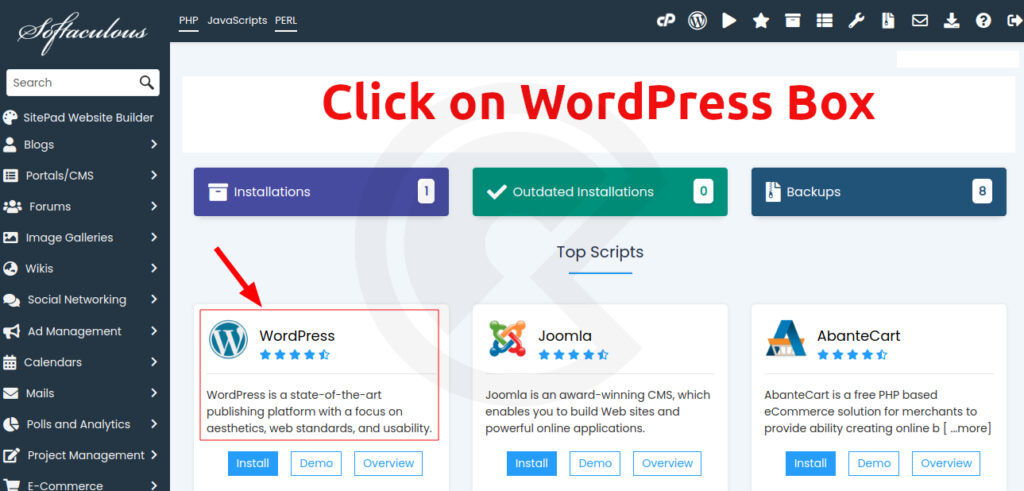
The good news is that all of the WordPress hosting options mentioned here provide staging mode. They do so through the Softaculous software, which allows you to install WordPress.
To activate staging mode through this software from your hosting control panel (CPanel), simply click on the Staging icon.
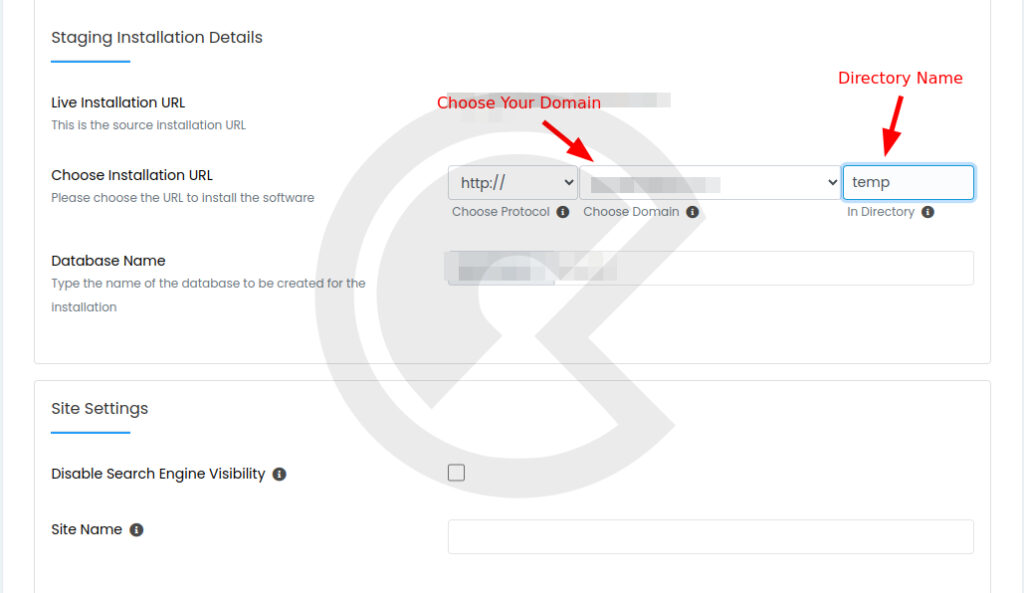
However, there’s one important limitation to keep in mind: you must have a registered domain to connect to this hosting before you can launch a staging website under that domain.
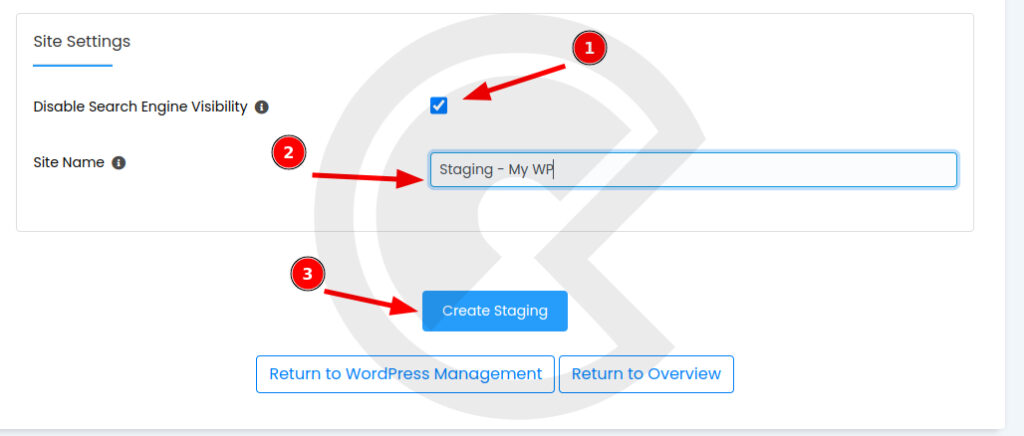
To address this, some WordPress hosting providers like DreamHost offer an easier solution. You can launch your staging WordPress site without having to register and connect your own domain. They provide a free subdomain under their specific domain, such as yourwebsitename.dreamhosters.com, for your staging site.
8. Install WordPress & Theme
Once you’ve launched your staging site and installed WordPress, you can proceed to install your preferred or purchased themes.
To install a WordPress theme, follow these simple steps:
- Go to your WordPress Dashboard.
- Click on “Appearance” in the menu on the left-hand side.
- Select “Themes.”
- Click on the “Add New” button.
- You’ll see an option to “Upload Theme.” Click on it.
- Upload the theme zip file that you’ve either purchased or downloaded.
- Once the upload is complete, click the “Activate” button to make your chosen theme active on your website.
9. Import Blogger Contents to WordPress
Now it’s time to bring in your Blogger XML file to import your posts and pages into your new WordPress blog.
It’s a straightforward process. Just follow these steps:
- Install the Blogger Importer Plugin
- After installing the plugin, upload your Blogger XML files. If you’ve split your XML file into multiple parts, upload each of them one by one.
- Before you start the upload, take a moment to check your blog post or page permalinks structure.
- To do this, go to your WordPress Dashboard, click on “Settings,” and then select “Permalink.”
- Choose the permalink structure that you prefer from the options provided.
- Now, you can proceed with the import process.
10. Store Blogger images to WordPress Hosting
After you’ve imported your Blogger posts and pages, you might notice that only the text content and some images have been imported. These images may have a lower resolution, and the rest of them are linked to external sources on Blogger.
To bring all the images from Blogger into your own hosted storage on WordPress, I recommend replacing each image by editing each post or page through your WordPress Dashboard.
Here’s how to do it:
- Go to your WordPress Dashboard.
- Click on “Posts” or “Pages,” depending on where you want to make changes.
- Select the post or page you want to edit.
- Inside the editor, locate the images you want to replace.
- Delete the existing image and then upload a new one from your computer or device. This will store the image on your WordPress hosting.
If you have a large number of published posts with images linked to external sources, you can use a free WordPress plugin called Auto Upload Images.
Here’s how to use the plugin:
- Install and activate the plugin before importing your Blogger XML file.
- If you’ve already imported your content, you’ll need to update each post or page again. This will trigger the plugin to save all externally hosted images to your WordPress storage.
11. Update Post Featured Images
After moving your blog from Blogger to WordPress, you might notice changes in the featured images. Some of your posts may have featured images set automatically, while others may not have any.
To solve this issue, you can use a helpful plugin Auto Featured Image. This plugin automatically sets the first image in each post as the featured image.
Alternatively, if you prefer to have more control, you can manually set the featured image for each blog post. You can do this from the right sidebar while editing each post in WordPress.
12. Update Widgets
Remember when I advised you to save your Blogger gadgets and widgets in a text file? Well, now it’s time to put that into action.
Here’s what you need to do:
- Open the text file where you saved your Blogger gadget/widget codes.
- Copy the code you want to use.
- Go to your WordPress Dashboard.
- Navigate to “Appearance” and then select “Widgets.”
- Add a widget box based on your requirements.
- Paste the copied code into the widget box.
By following these steps, you can easily transfer and use your Blogger gadgets and widgets on your WordPress site.
13. Basic WordPress Setting & Alpha Testing
In this step, it’s important to update various elements of your WordPress site, such as Navigation items, Logo, Site Icon, Footer, and Sidebar to ensure they reflect your desired look and content.
Here’s what you should do:
- Update Navigation items: Make sure your website’s navigation menu is organized the way you want it, with the right links and pages.
- Logo and Site Icon: Upload your site’s logo and set a site icon (favicon) for your WordPress site.
- Footer and Sidebar: Customize the footer and sidebar sections to display the content and widgets you prefer.
After updating these elements, it’s crucial to thoroughly test your entire new WordPress blog to ensure that everything appears and functions as expected. If you notice any issues or need to make changes, this is the step to do it.
Keep in mind not to update links that contain the staging domain part at this stage. You’ll address these types of tasks in later steps.
14. Staging to Live: Connect Existing Domain to New Hosting
After you’ve finished testing your website, it’s time to connect your domain that you previously used with your Blogger blog.
Go to the account where you bought your domain (your domain registrar).
Change the NameServer (NS) settings in your domain registrar account to match the NameServer provided by your hosting provider. If you can’t find these settings or run into any issues, don’t worry. You can ask for help from your domain registrar’s support center, and they should assist you.
It might take up to 48 hours for these changes to take effect. During this time, your website may not be accessible. However, based on my experience, it often updates much faster, usually within 1 to 3 hours.
If you don’t already have a custom domain, some hosting providers offer a free domain when you buy a hosting package. But please note that not all hosting providers provide this service, and some may charge around $10 to $16 USD for a domain name for a year.
Once your domain’s NameServer is connected to your hosting, you can switch your WordPress site from staging mode to live mode.
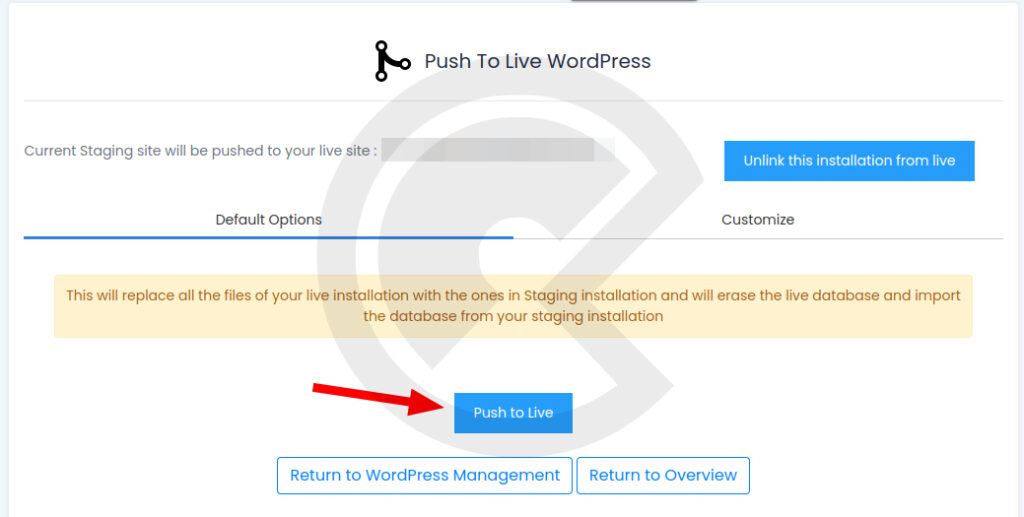
After you’ve confirmed that this step is done successfully, you can move on to the next one in the process.
15. Make Blogger Blog Private
Now, it’s time to make your current Blogger-hosted blog private so that it doesn’t affect the user experience and SEO performance of your new blog.
Here’s how to do it:
- Go to your Blogger Dashboard.
- Click on “Settings.”
- Under “Reader Access,” change the setting from “Public” to “Private.”
- Also, in the Blogger Dashboard, navigate to “Settings” and then “Custom Domain.”
- Delete your current domain to remove it permanently.
By following these steps, your Blogger blog will become private and no longer impact your new blog’s performance.
16. Update Internal Links to Posts & Pages
In this step, we’ll take care of updating the internal links on your WordPress blog. This is because we’ve already connected our main domain to the new blog.
Now, you can easily update all the links within your posts, pages, and even your navigation menu links to make sure they point to the right places on your new website.
17. Redirect 403 & 404 URLs
When you’re in the process of moving from Blogger to WordPress, one of the most discussed topics is how to handle the format of your permalinks, which are the web addresses of your posts and pages.
Blogger and WordPress have different structures for these web addresses, and it can certainly have an impact on your website’s SEO and user experience. Yes, it definitely matters!
But here’s the good news: the solution is in your hands. WordPress is renowned for its plugins, and you can easily address this issue by installing the Redirection Plugin.
Once it’s installed, you can configure it from your WordPress Dashboard.
With the help of this plugin, you can match parameters and redirect your old Blogger URLs to the corresponding posts or pages on your new WordPress site, ensuring a smooth transition for both users and search engines.
18. Install Recommended Plugins
If you’re new to WordPress, there are some essential steps to take after starting your blog. One of them is installing and activating certain recommended plugins, such as those for SEO, traffic analysis, security, backup, and caching.
However, it’s important to avoid installing multiple plugins that belong to the same category because they can conflict with each other and cause issues on your site.
So, choose your plugins wisely and stick to one for each specific function to ensure your WordPress blog runs smoothly.
19. Beta Testing
Before moving to the final step, it’s a good idea to run one more round of beta testing. This will help you thoroughly check the overall appearance and functionality of your website and make sure everything is perfect.
If you find that you still need to make any changes or modifications, feel free to do so before proceeding to the last and final step of this process.
20. Submit to Google Search Console
This is the last and final step in the process. Because you’ve shifted to a new platform and changed the structure of your blog’s files, it’s crucial to inform search engines like Google about these changes.
To accomplish this:
- Update your sitemap in Google Search Console to make sure Google is aware of your new website structure.
- You can also update your home page by using the “Inspect” tool, then select “Request Index,” and choose “Live.”
Congratulations! You have successfully transferred your Google Blogger blog to WordPress. Well done!
How To Transfer Google Blogger to WordPress | Step By Step Guide
# Written by Elliyas Ahmed


