How to Use Google Search Console (Webmaster Tools)
'Google Search Console' was known as 'Google Webmaster Tool'. But Web-Tech Giant Google has changed it into Search Console. Google Search Console is the most popular web search consoling website. Indexing, Crawling, Sitemap submitting, Search traffic analyzing, Search appearance, Security issues checking are the main purposes to use it.

Before discussing in details, we need to know how to create an account for Google Search Console. It is similar to create an account with Gmail for any product of Google.
1. Go to Search Console and sign in with your Gmail and password.
2. After signing you will look an option to add the property as below.

Put your web address (Web Property) and click on "ADD A PROPERTY".
3. If you add the custom domain (Example: www.compromath.com), you have to verify your property. It is not required for Blogspot domain.
To verify property click on your property (web address) and click Setting option like the following figure.
 4. There are the different method to verify your property in Google Search Console. You will be shown in the following image.

 Messages: Important message about your property is sent to Google Search Console. You should check it and solve according to its instruction.
Search Appearances: Under search appearances option you will see the following option.
Search Traffic: Under search traffic option you will see the following option.

You can add sitemap by commanding 'ADD/TEST SITEMAP' and then do according to the figure.


Before discussing in details, we need to know how to create an account for Google Search Console. It is similar to create an account with Gmail for any product of Google.
1. Go to Search Console and sign in with your Gmail and password.
2. After signing you will look an option to add the property as below.

Put your web address (Web Property) and click on "ADD A PROPERTY".
3. If you add the custom domain (Example: www.compromath.com), you have to verify your property. It is not required for Blogspot domain.
To verify property click on your property (web address) and click Setting option like the following figure.


For Blogger user, use 'HTML tag' option to verify. See how to verify site ownership at Google Search Console by using meta tag.5. After verification, you are ready to use Google Search Console.
For Wordpress user, you can use first three option.
Dashboard Introduction
The dashboard of Google Search Console is like as below.
Search Appearances: Under search appearances option you will see the following option.
Search Traffic: Under search traffic option you will see the following option.
Google Index: Under Google Index option you will see the following option.
Crawl: Under Crawl option, you will see the following option. Crawl means the attempt to find your post, URL, text, images etc to show on the search engine.
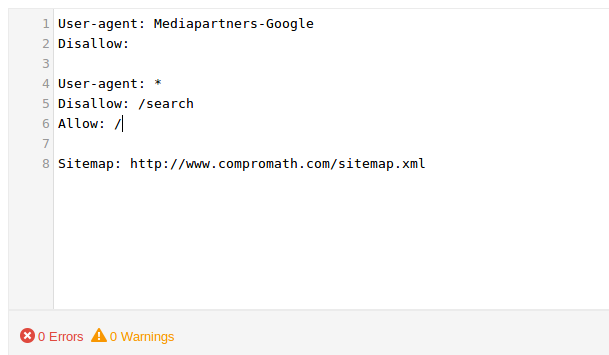
If any errors then configure your robots.txt file according to below. For Blogger, go to Blogger Dashboard→Search Preferences→Crawlers and indexing→Custom robots.txt→Edit

You can add sitemap by commanding 'ADD/TEST SITEMAP' and then do according to the figure.

But before adding you have to create a sitemap.XML file. You can do it from here. Then complete 'Test/Submit' option.
Security Issues: If any security issues (hacking, malware etc) about your website be found then it will notify you.
Other Resources: You can use different Google Web tools for your website.
Security Issues: If any security issues (hacking, malware etc) about your website be found then it will notify you.
Other Resources: You can use different Google Web tools for your website.
Recommended: Improve your search engine ranking.Have got this article helpful or not working? Put your comment below.
Make your Blogger more SEO Friendly.
